Mod: Weather Station


DETAILS: Weather Station
I’ve always wanted a weather station inside the RV that would accurately indicate outside air temperature (especially when off the grid without internet weather). I also wanted one with a high quality display with lots of features and functions that could be hard-wired directly to the 12v system (and not require the use of the inverter). I purchased 5 makes/models from Amazon until I settled on this one. It’s now become one of my favorite mods!
Features and Functions Overview
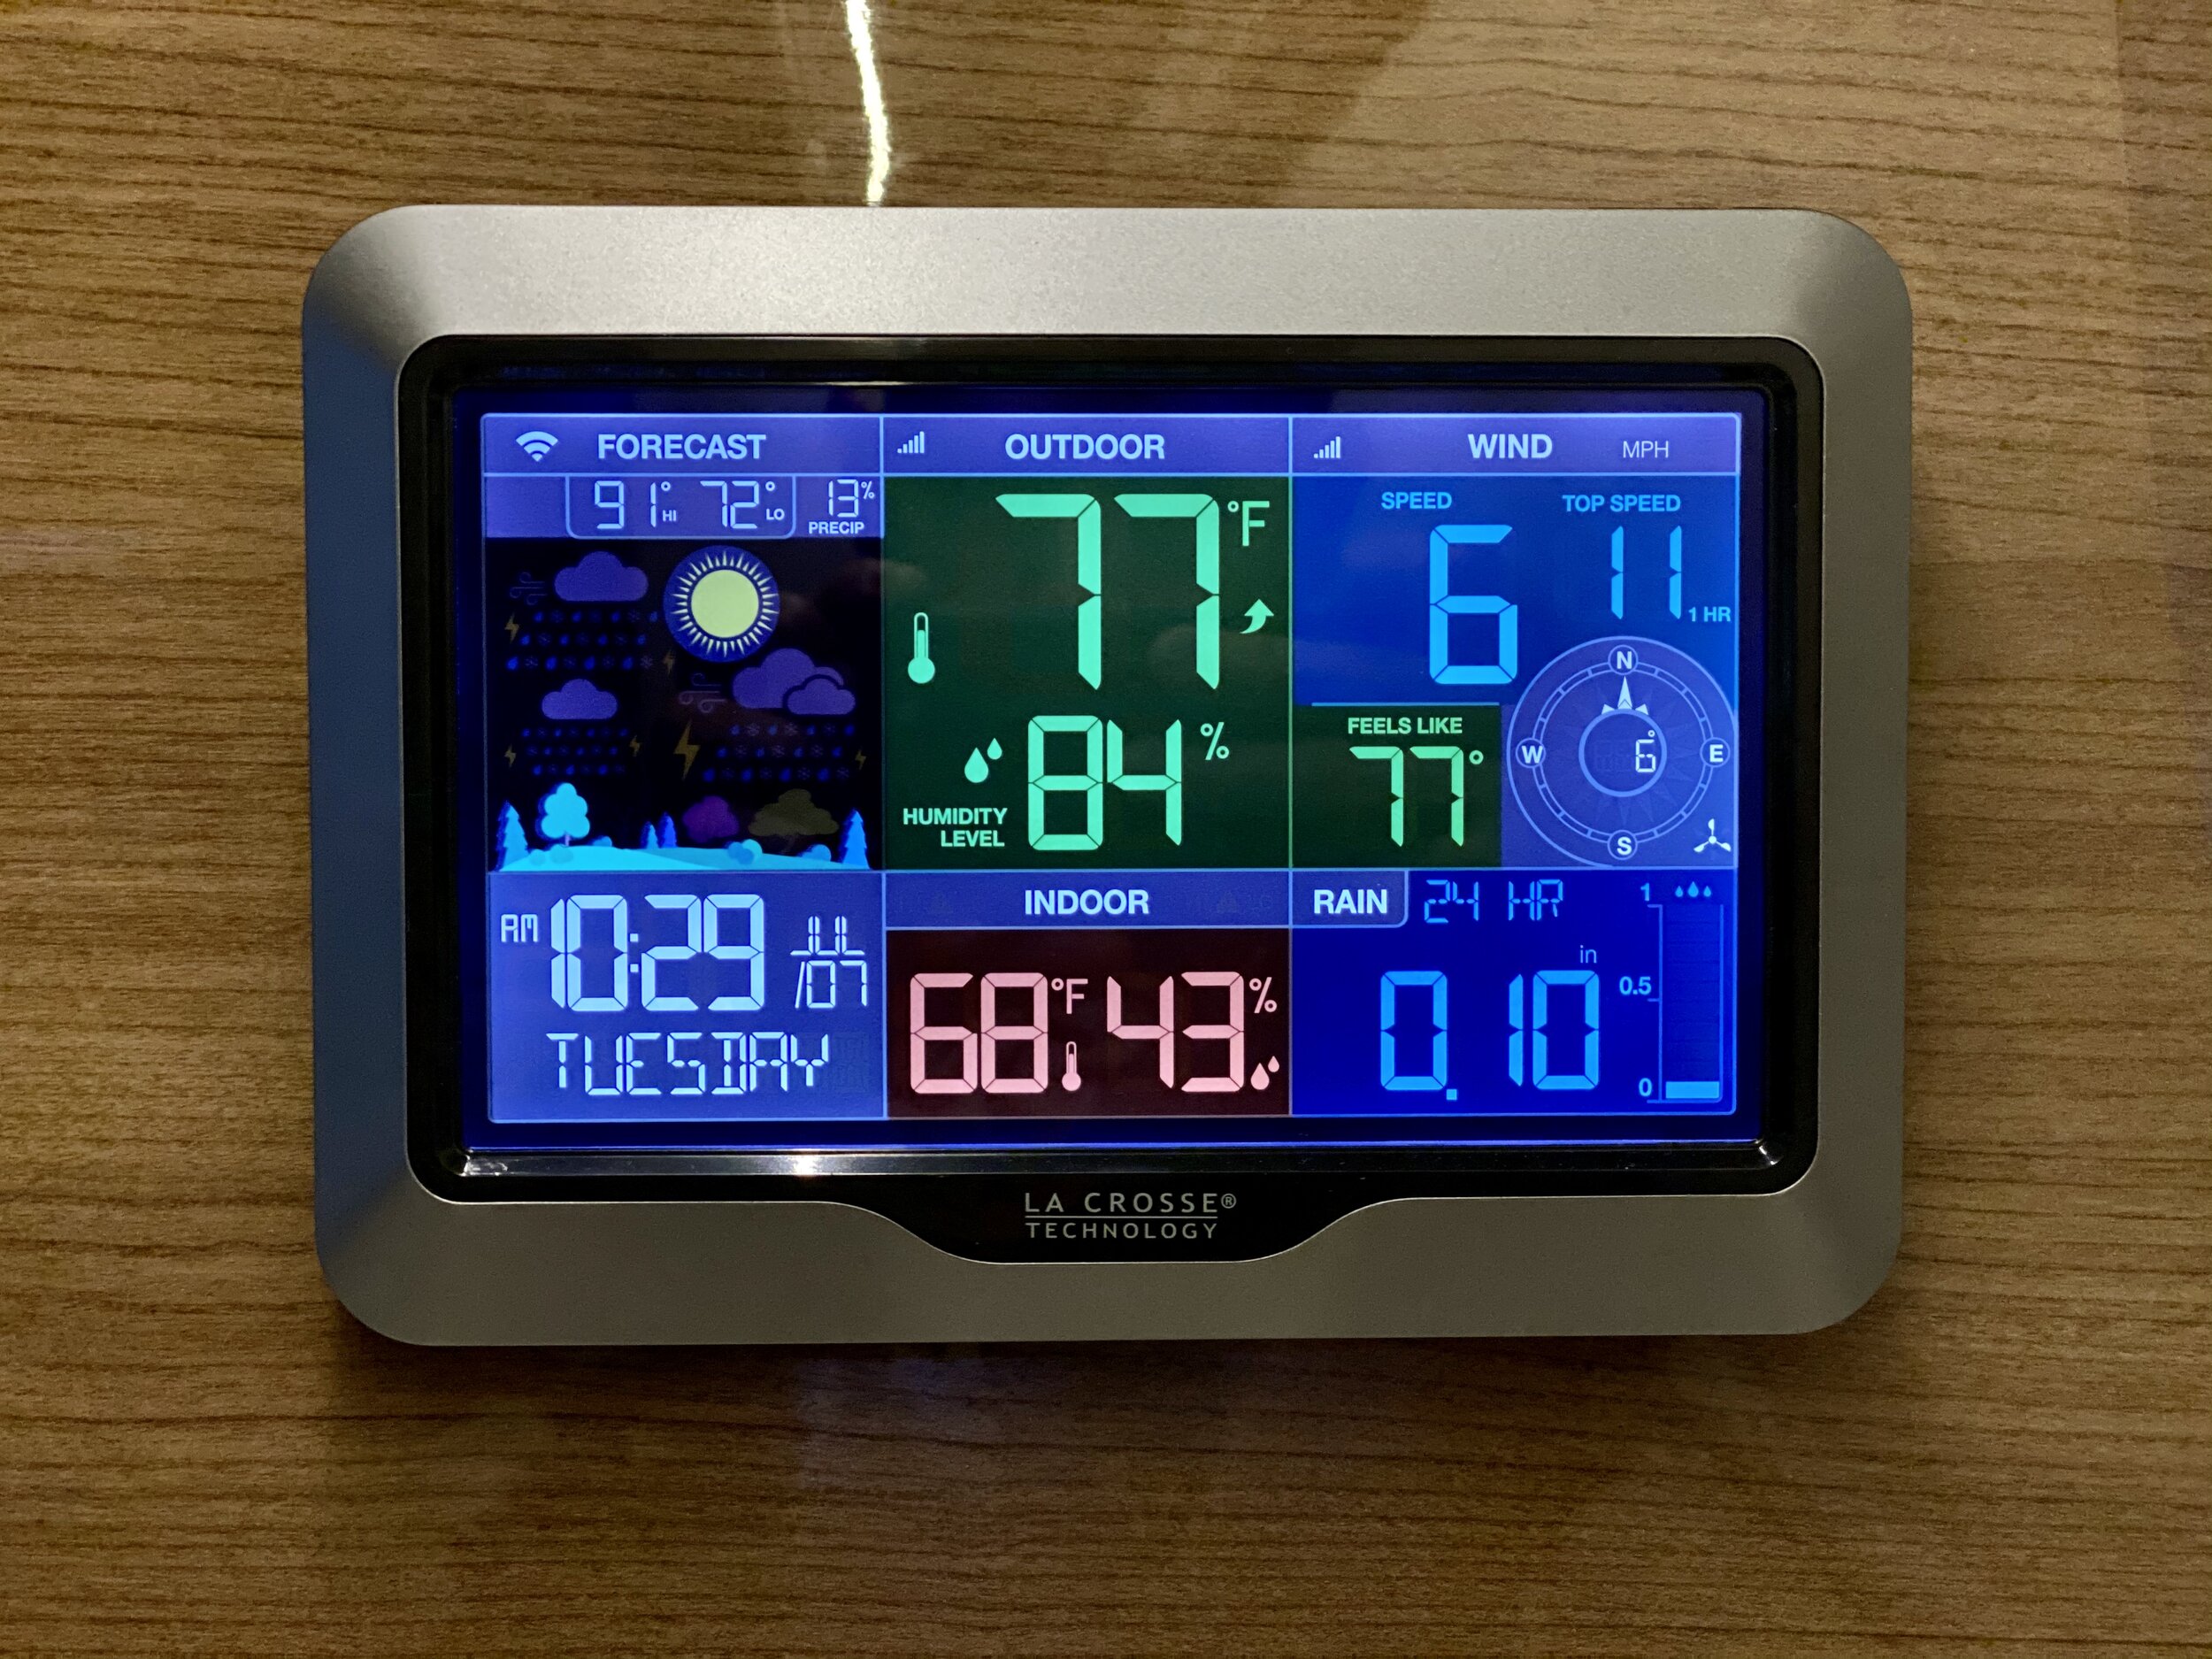
This particular model — the La Crosse Technology V40A-PROv2 — is so much more than just a weather station. In addition to inside/outside temperature and humidity, you can add additional sensors and place them in various parts of the RV which are then viewable via a smartphone app. It will track and graph the rise and fall of temps and humidity for each sensor (i.e. in your battery bay, service bay, food pantry, refrigerator, freezer, etc.). Note: only the inside and one outside temperature sensor’s data will display on the weather station itself — the rest are viewed through the app (see screenshots).
If you have internet in your RV, you can check any of your sensor readings remotely through the free app (perfect if you travel with a pet). I use this function daily to confirm that my AC is still running and that my refrigerator is operating correctly.
Additional Temp/Humidity and Water Leak Sensors
I’ll be the first to admit that this aspect of my setup is total overkill: I added a total of 9 additional sensors including inside my refrigerator, freezer, food pantries, “wine cellar”, the attic (overhead bunk) as well as a temperature and water leak sensor at the base of my water pump. None of these are necessary, but they add additional functionality and data points. The system is modular, so you can add to it later if you wish — or just keep it as-is out of the box. Once I saw the usefulness of the additional sensors, I started adding more over time.
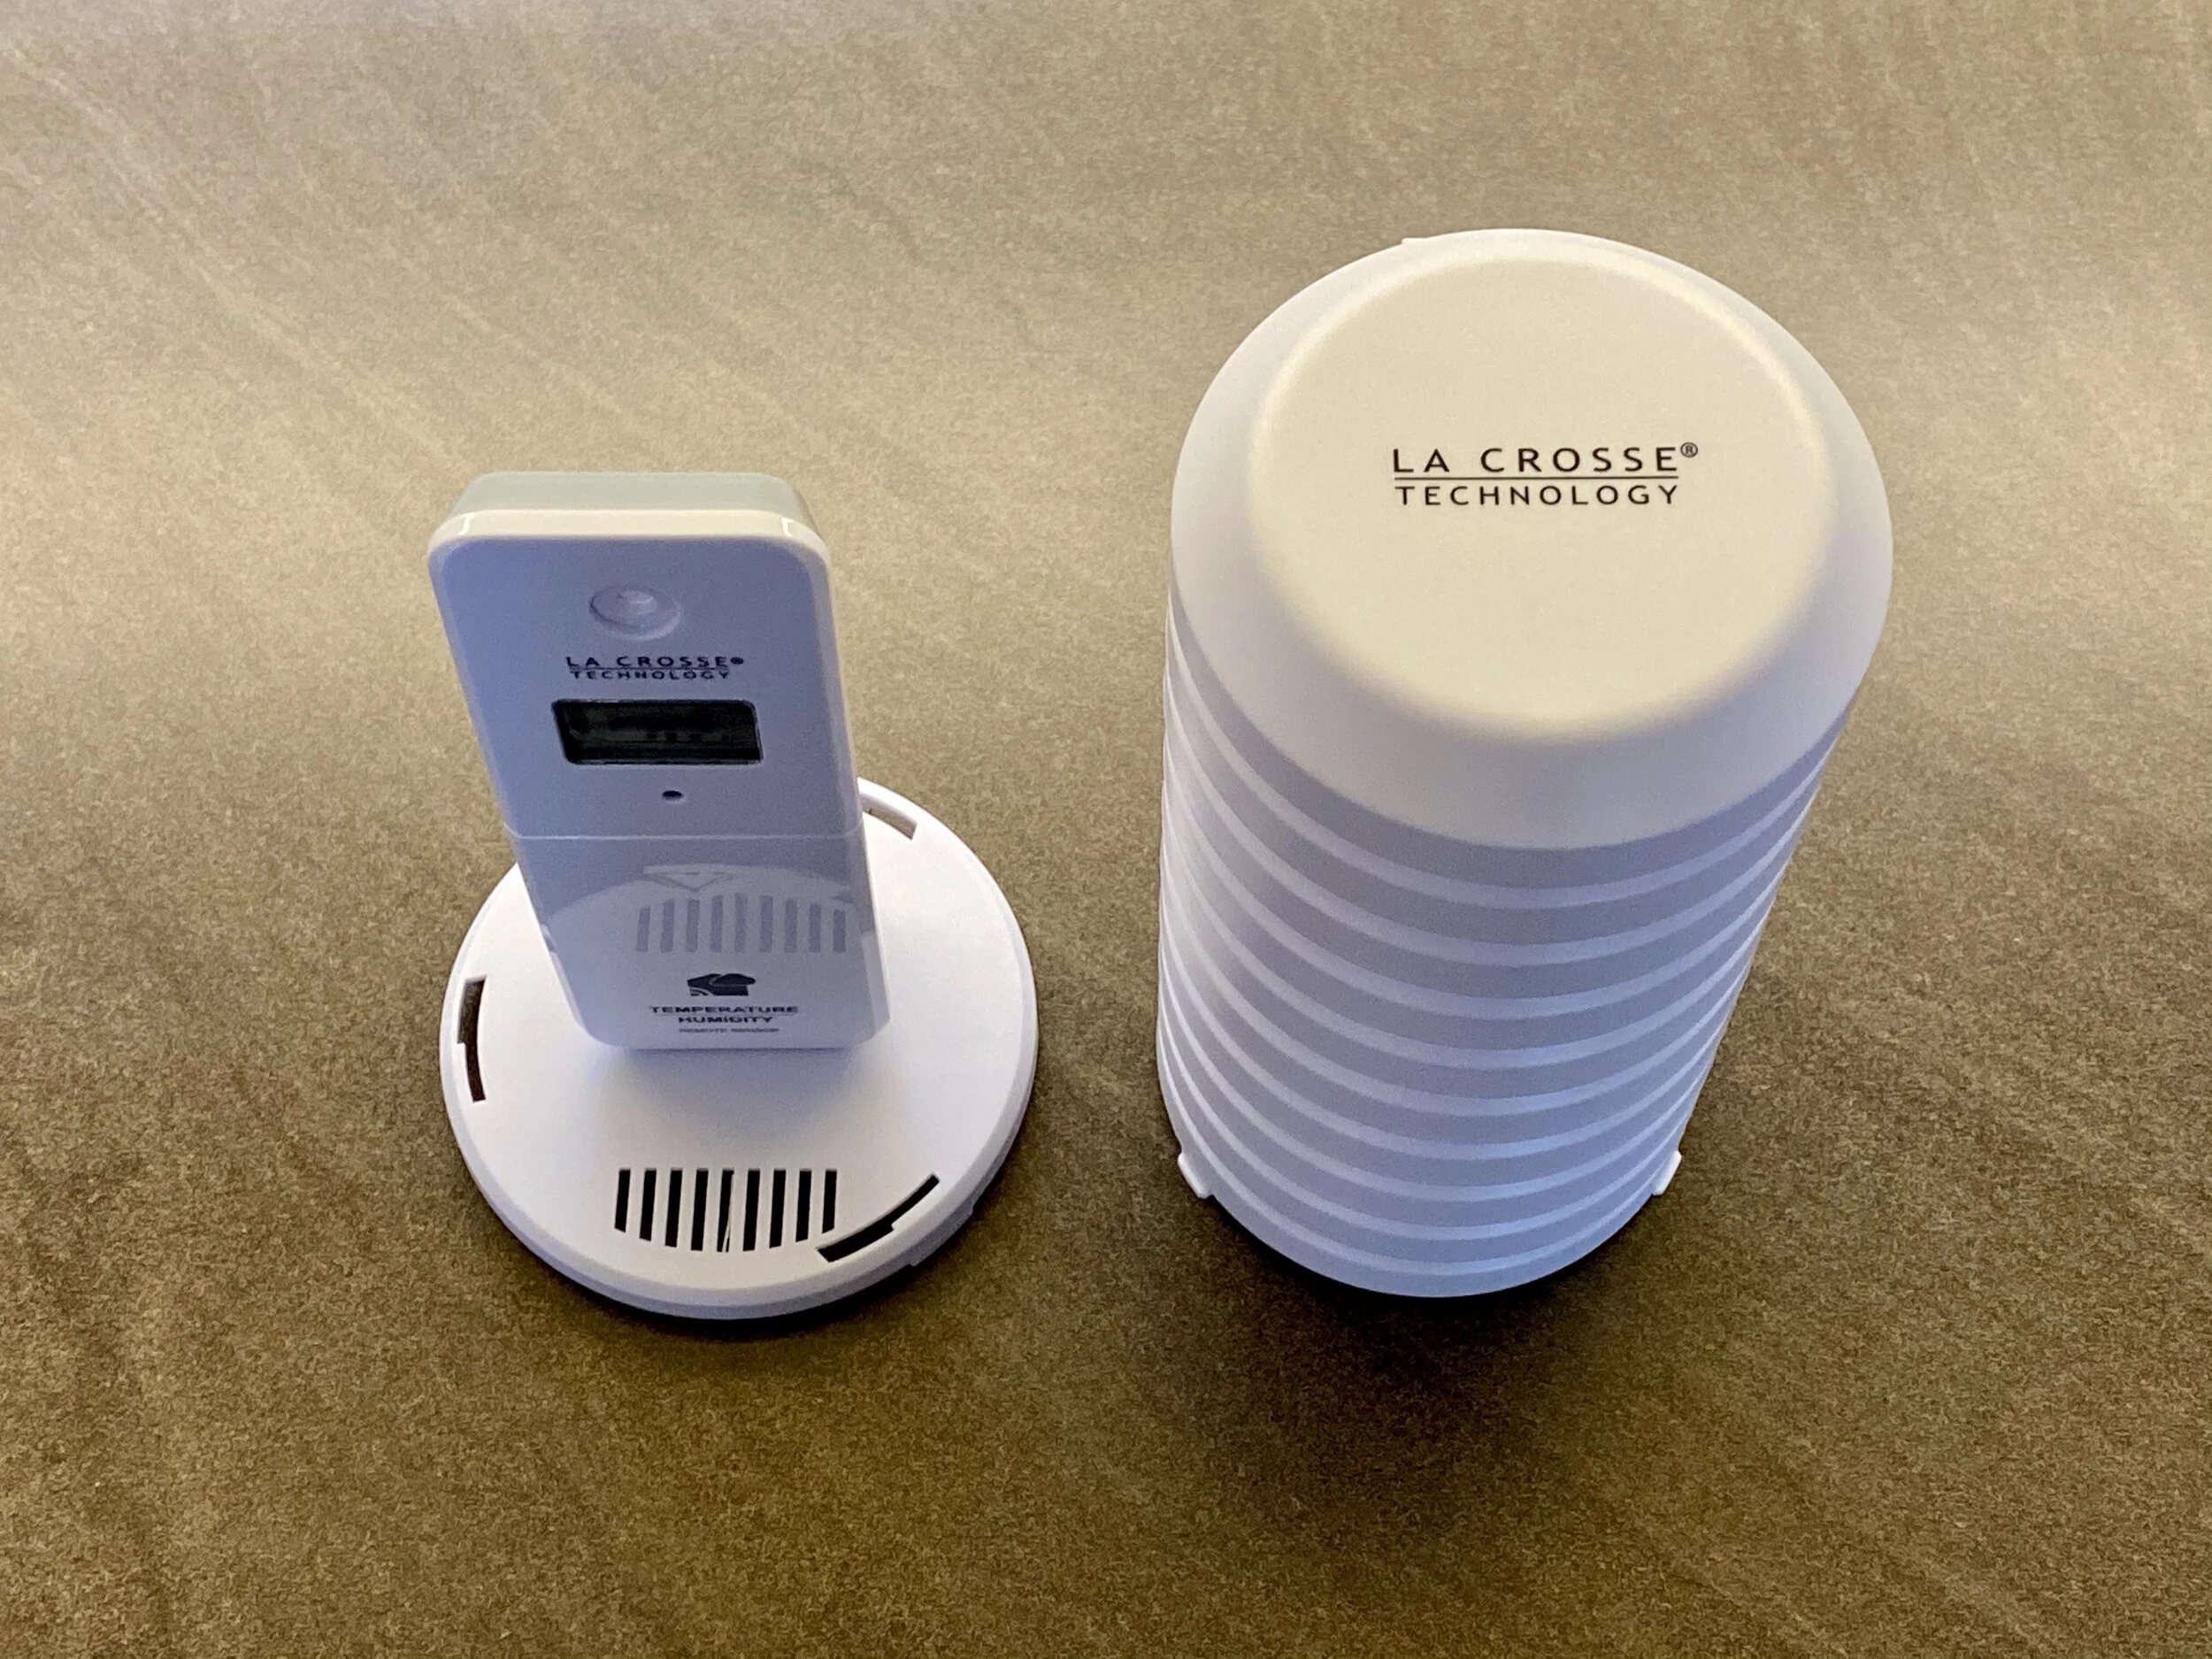
Out of the box, you get the inside temp/humidity sensor (integrated into the weather station display), an outside temp/humidity sensor that you mount outside (see below), and the Wind & Rain sensor which I mounted on a pole attached to the outside ladder (more on this below).
I mounted the additional sensors (which are identical to the included outside sensor) in the following areas:
Battery Bay: to track any extreme temperatures that would affect charging
Service Bay: to monitor freezing temps in the winter that might affect the water connections
Refrigerator: to monitor and graph the temps inside the fridge
Freezer: to monitor and graph the temps inside the freezer
Attic (overhead bunk): to monitor food that I have stored in bins in this area
Dashboard: to monitor the extreme temperatures in the cab (in the upper/center area in the shade)
Wine Cellar (under dinette seats): to monitor associated temperatures (this insulated area tends to fluctuate less)
Port Pantry (overhead cabinet above dinette): to monitor associated temperatures that tend to get warm
Starboard Pantry (overhead cabinet above stove): to monitor associated temperatures that tend to get warm
Water Heater: to monitor and graph the water heater’s operation
Water Pump (Temp + Leak Sensor): to monitor water tank temp in winter as well as indicate the first moment of a leak
Standalone vs. Wi-Fi Mode
This weather station works with or without Wi-Fi. In either configuration, the indoor temperature/humidity is recorded from internal sensors within the display. The outdoor temperature/humidity is sent via a radio frequency from an included external sensor that you mount outside (requires 2 AA batteries which are rated for 24+ months of use).
If connected to Wi-Fi, the forecasted “Hi” and “Lo” as well as precipitation % is updated via the National Weather Service (NWS) over the internet based on the zip code and timezone that you set. In a standalone configuration (no Wi-Fi), the temperature “Hi” and “Lo” represent the high and low temperatures as recorded from the external sensor since midnight (updated daily).
Pet Monitor
While I don’t travel with pets, the ability to monitor the inside temperature of your RV remotely is a great justification for an internet-enabled weather station. I’ve seen some dedicated pet monitors that have a similar cost for the hardware (compared to the weather station hardware) as well as a comparable monthly subscription cost to the Visible Wi-Fi network and router that I installed in my RV. However, with this setup of a weather station connected to always-on Wi-Fi, you have internet for every other device in your RV (i.e. laptop, tablet, Apple TV, etc.) and not just a pet monitor.
Weather Underground
You can connect the weather station to Weather Underground (WU) and share your outdoor temperature, wind and rain sensor info with others via the WU website. To view the live and historical weather data for my Navion’s weather station, click here. Live info appears at the top of the page; scroll down to the bottom to see the historical charts and graphs.
PLEASE NOTE: the location information on the WU page does not show the actual location of my RV — instead, it’s a city in Nebraska where I first connected my weather station to WU. The WU website does not have a way to dynamically update the location when you move, which is just as well for privacy reasons. For more information about how to connect the weather station to WU, click here to download the Weather Station’s user manual and reference the step-by-step instructions on page 21. Connecting your weather station to WU does require your weather station to be online.
Enhanced Services
La Crosse Technology, the manufacturer of the weather station, offers an Enhanced Service Plan option for an annual fee of $11.88. This plan adds additional functionality to the weather station including customizable email alerts. For example, you can create an email alert if the inside temp exceeds 80 degrees; or if your refrigerator temp exceeds 41 degrees; or if your service bay’s temp drops below 32 degrees; or if your water pump leak sensor detects water, etc. For less than $1/month, paid annually, I went for it. It’s pretty neat to receive automatic email alerts from your RV!
Mounting the Weather Station
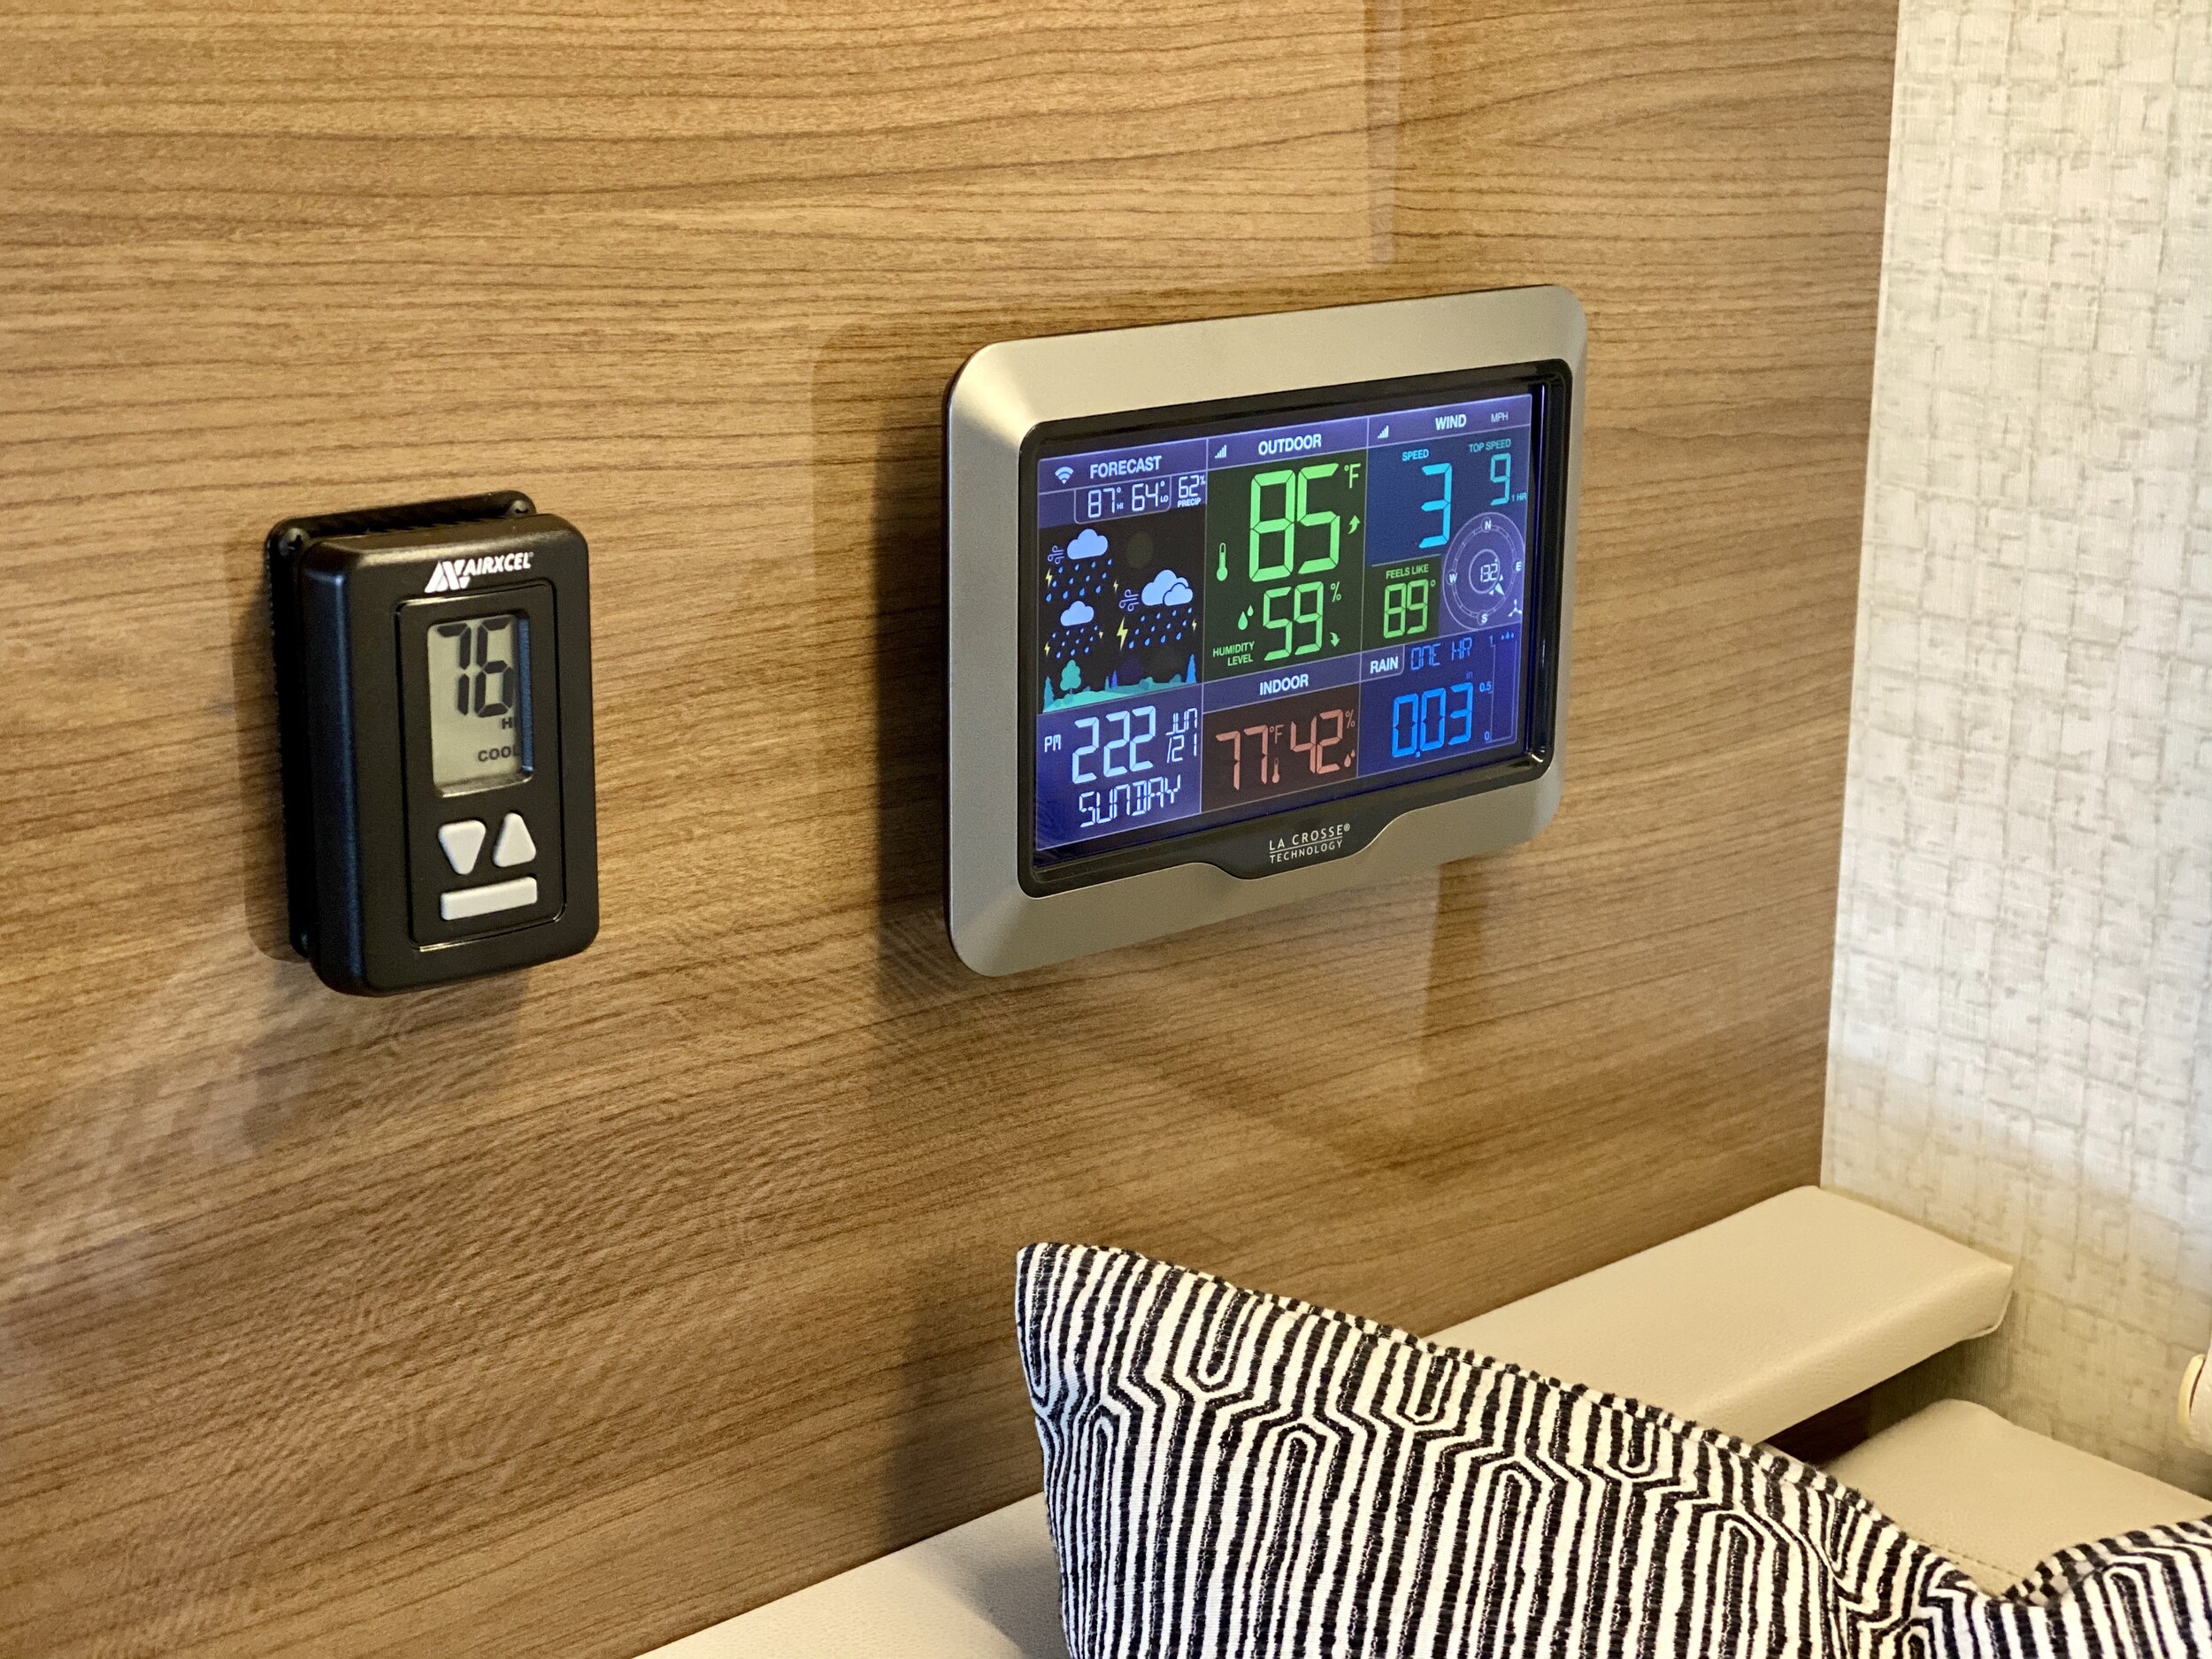
I mounted the weather station display to the wall of the RV near the dinette with two black Command Picture Hanging Strips (see photos). Each strip is rated for 16 lb. which is more than enough for the relatively light weather station. I’ve driven more than 2,500 miles since it was mounted and it hasn’t moved. And just like with all Command products, the hanging strips are removable and will leave no damage or residue behind.
Powering the Weather Station
The weather station comes with a 110vac power supply adaptor which plugs into a regular electrical outlet and steps down the voltage to 5vdc. I cut the wires to the power supply (see photos) and hard-wired it straight into the RV’s 12vdc electrical system via a DC to DC buck converter. The converter I used has the ability to adjust the output voltage, though you could use an alternative 12vdc to 5vdc converter that I’ve used in another application which is simpler and serves the same function: 5vdc output.
For a power source, I tapped the 12vdc wires feeding the propane detector that is located nearby (below the wardrobe closet). I fished the wires with a Wire Noodler kit through the area behind the thermostat and down the wall shared between the dinette and the wardrobe closet. I mounted the DC to DC buck converter on the inside wall below the wardrobe closet accessible by removing the subwoofer speaker (see photos).
Placement of Sensors
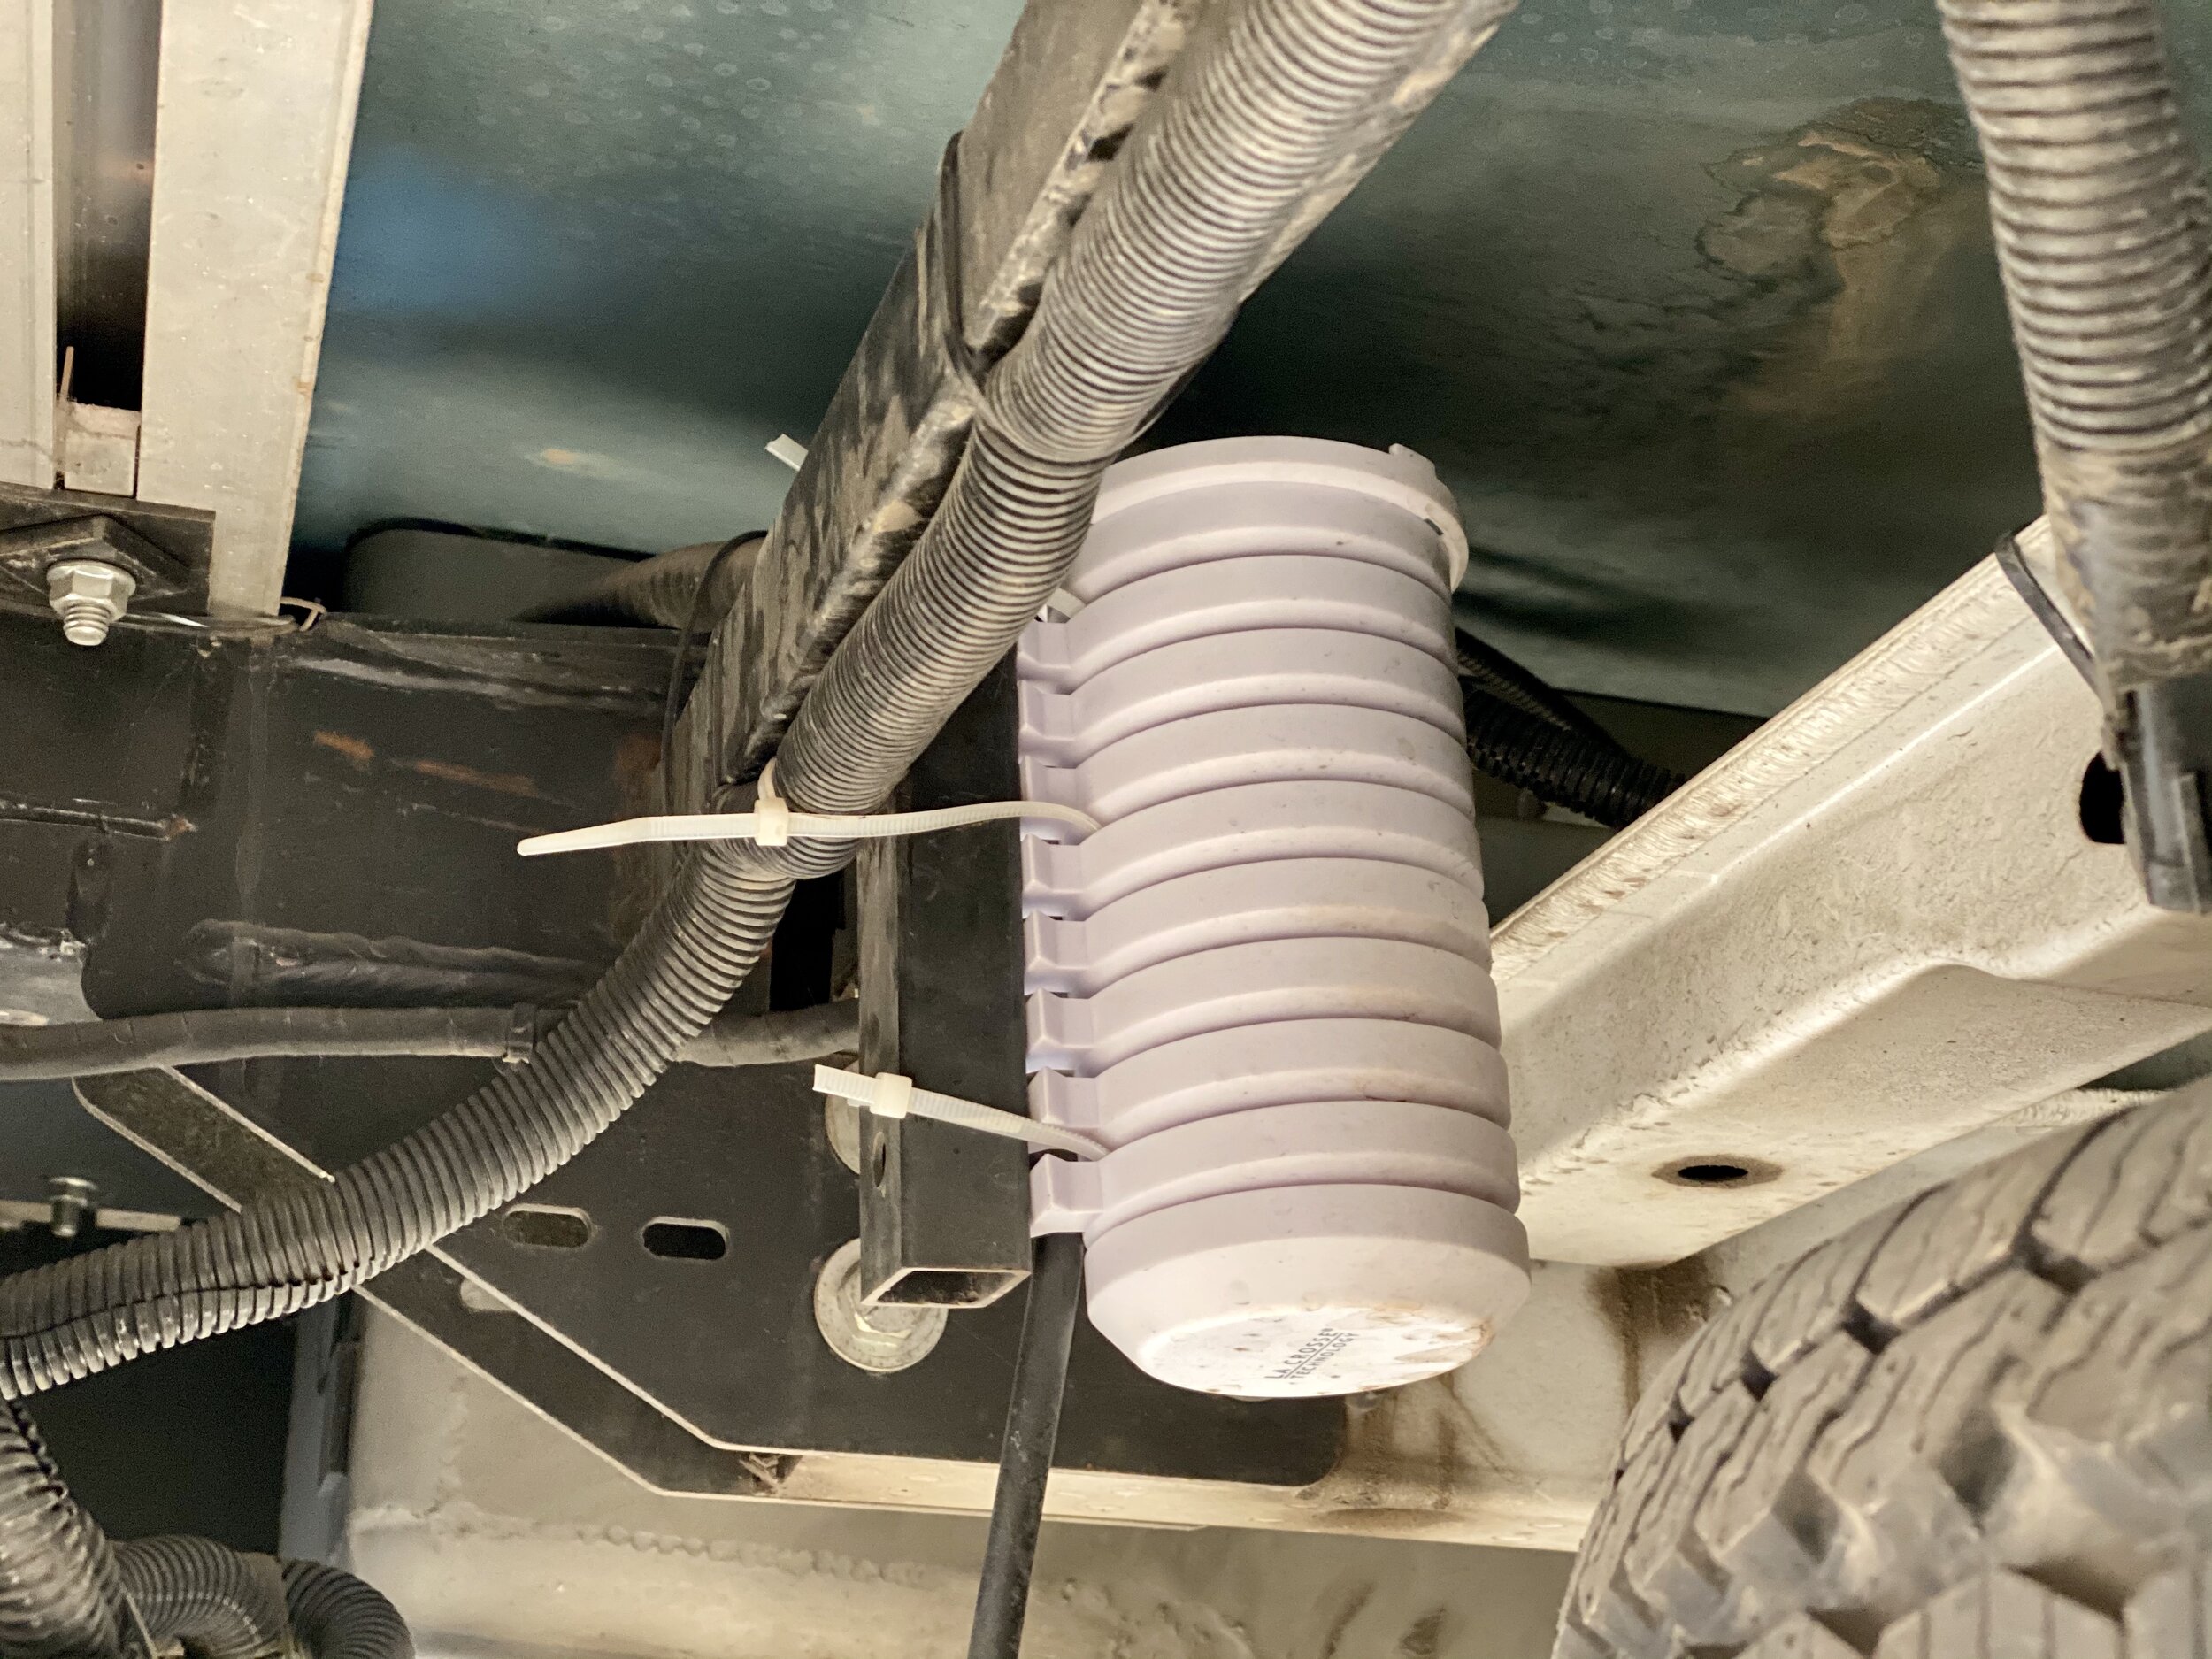
I placed the main outdoor sensor underneath the RV (in the shade) near the spare tire. I put the sensor inside a Sensor Protection Shield and then zip-tied it to three anchor points (see photo). The shield is upside down and the sensor is removed by a simple 1/4” twist and then you lift up. It’s basically impossible for it to fall while driving. I mounted a second outdoor sensor in the same way in the battery bay (see photo). All other sensors are mounted with Command Picture Hanging Strips for ease of removal to change the AA batteries (which are rated to last more than 24 months).
The Smartphone App
The free app in the App Store is aptly named “La Crosse View”! The app allows you to view all of the data from the weather station display on your smartphone (requires Wi-Fi in the RV). The app also includes live and historical graphs and charts from all of your sensors. It’s a lot of information that is pretty fascinating to study if you’re in to this kind of thing. At a minimum, it provides all of your sensor’s current temp and humidity levels at a glance.
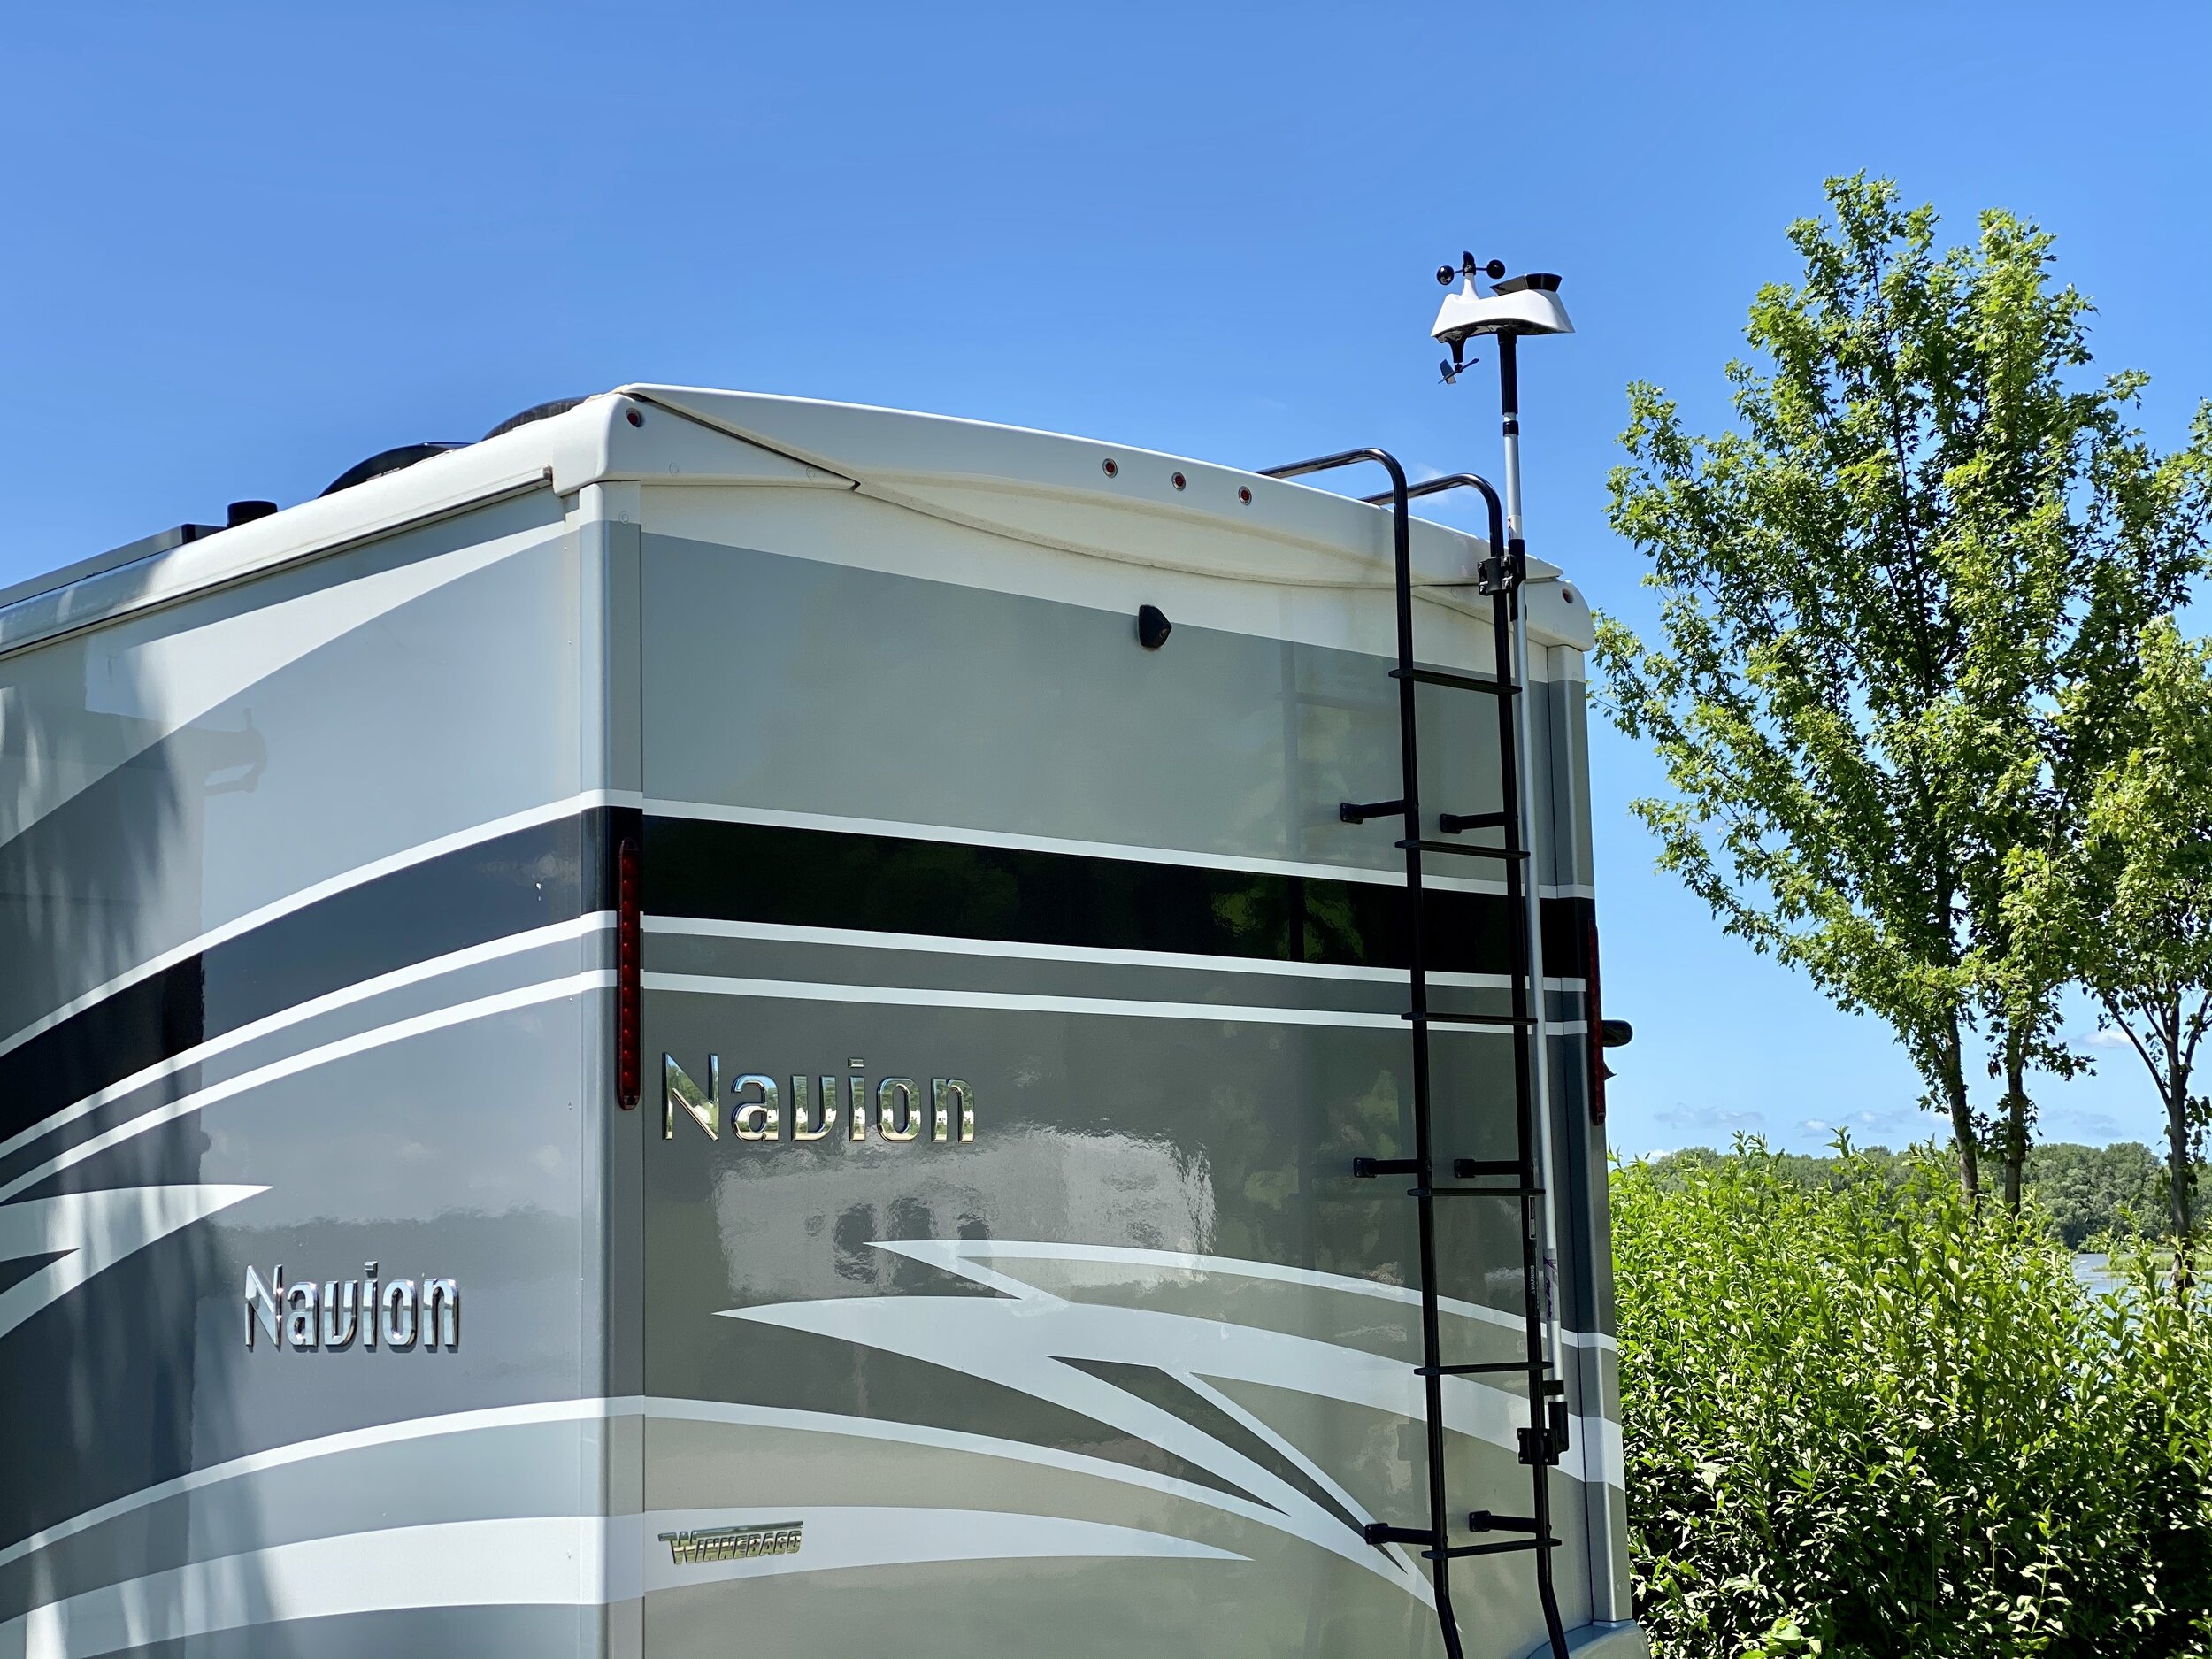
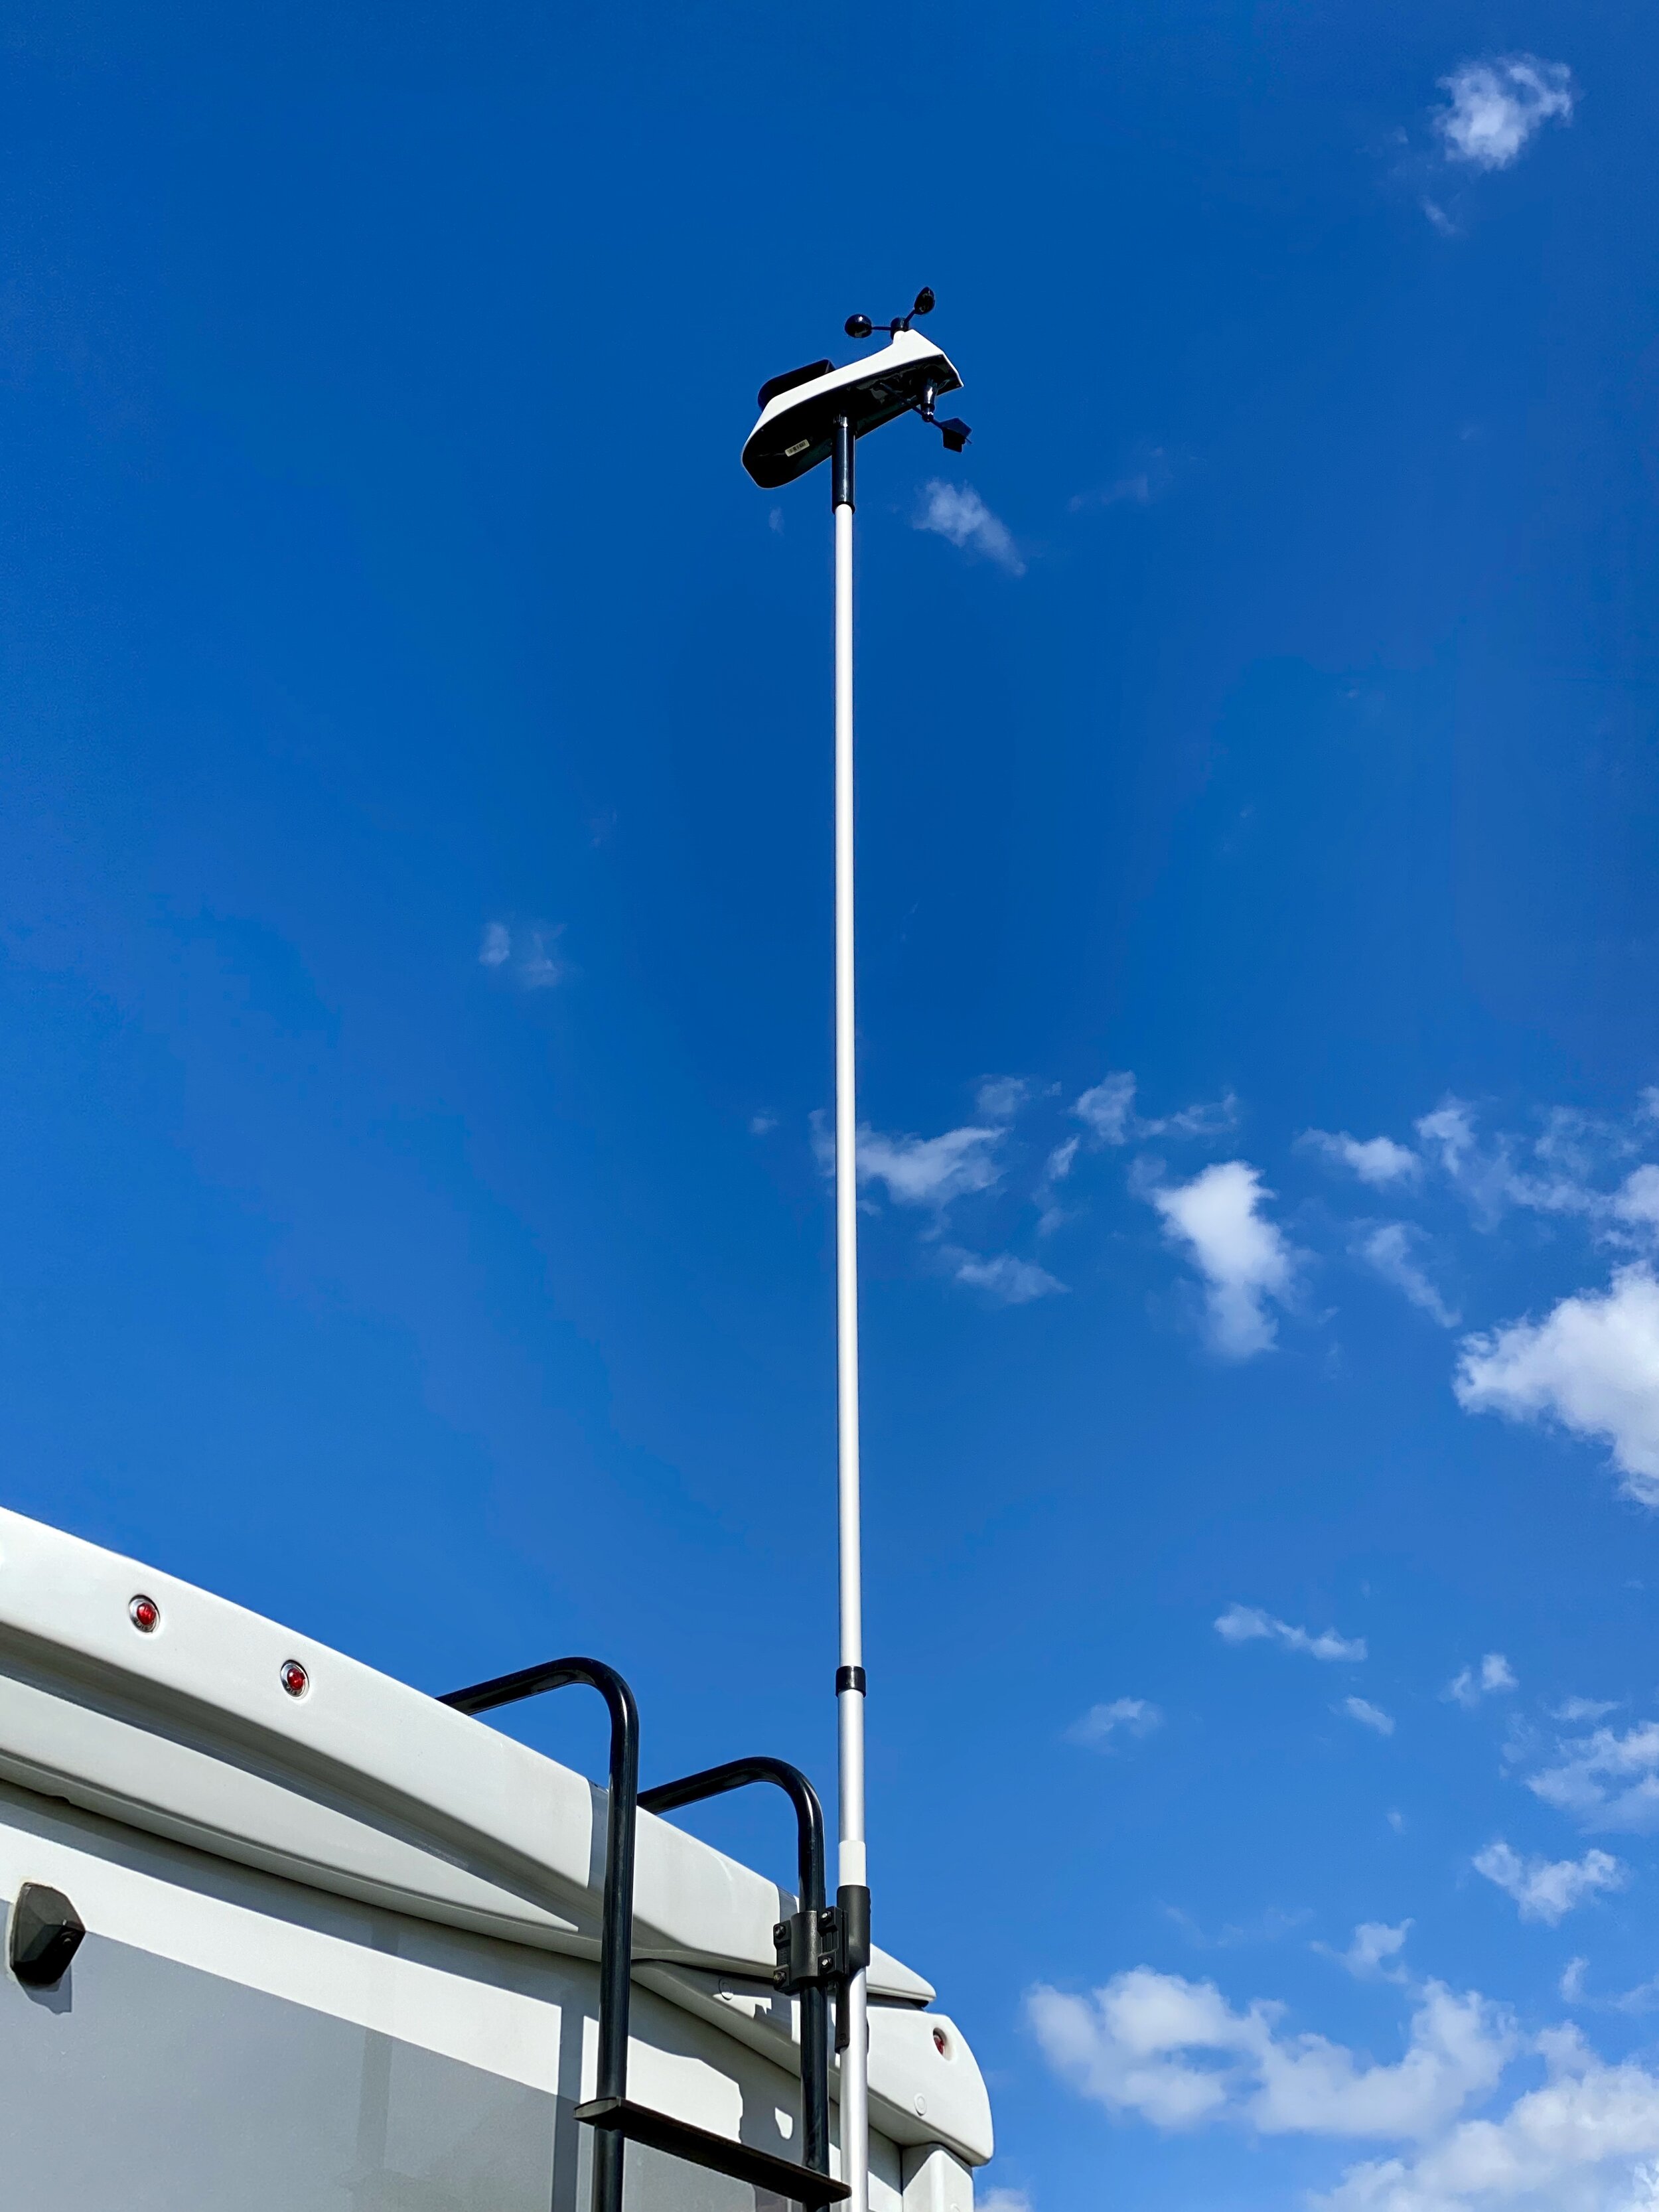
Mounting the Wind & Rain Gauge
The included Wind & Rain gauge comes with a small mount that would require screwing into a surface (like a railing on a deck or the roof of an RV). Instead, I utilized a flag pole designed for RVs and modified the mount to integrate seamlessly. The wind/rain sensor can be set up or broken down within 60 seconds, all from the ground and without climbing the ladder!
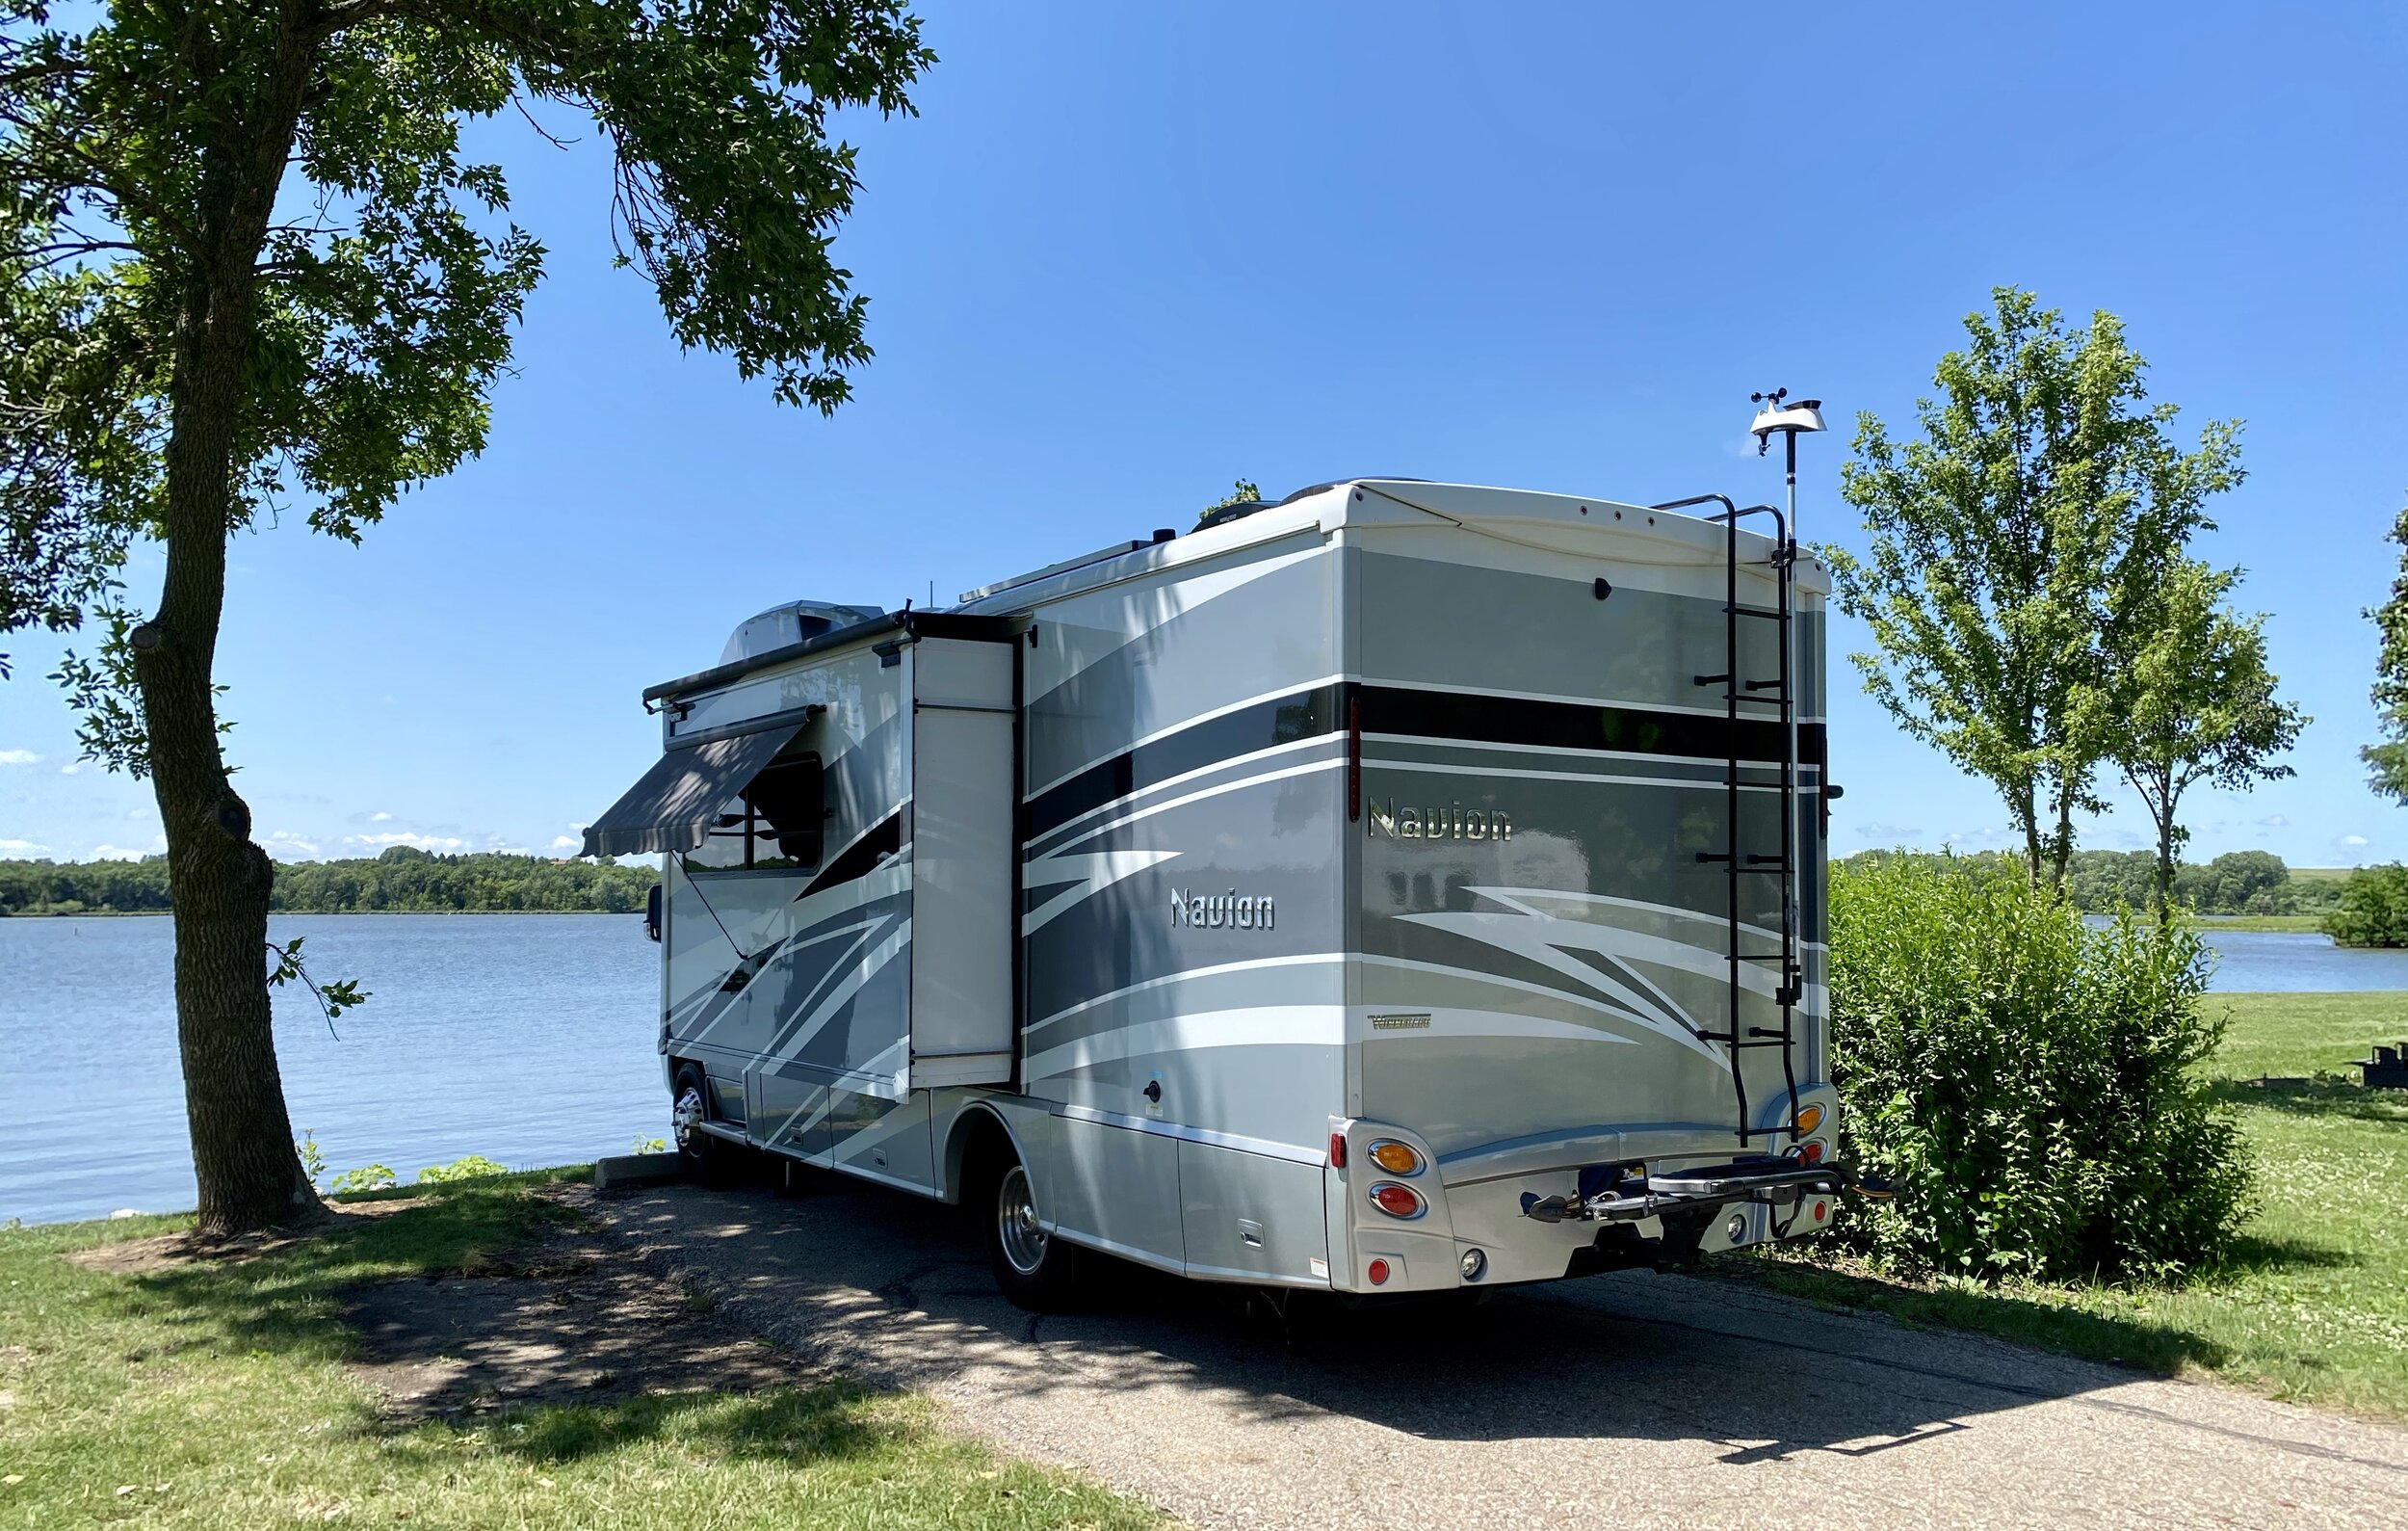
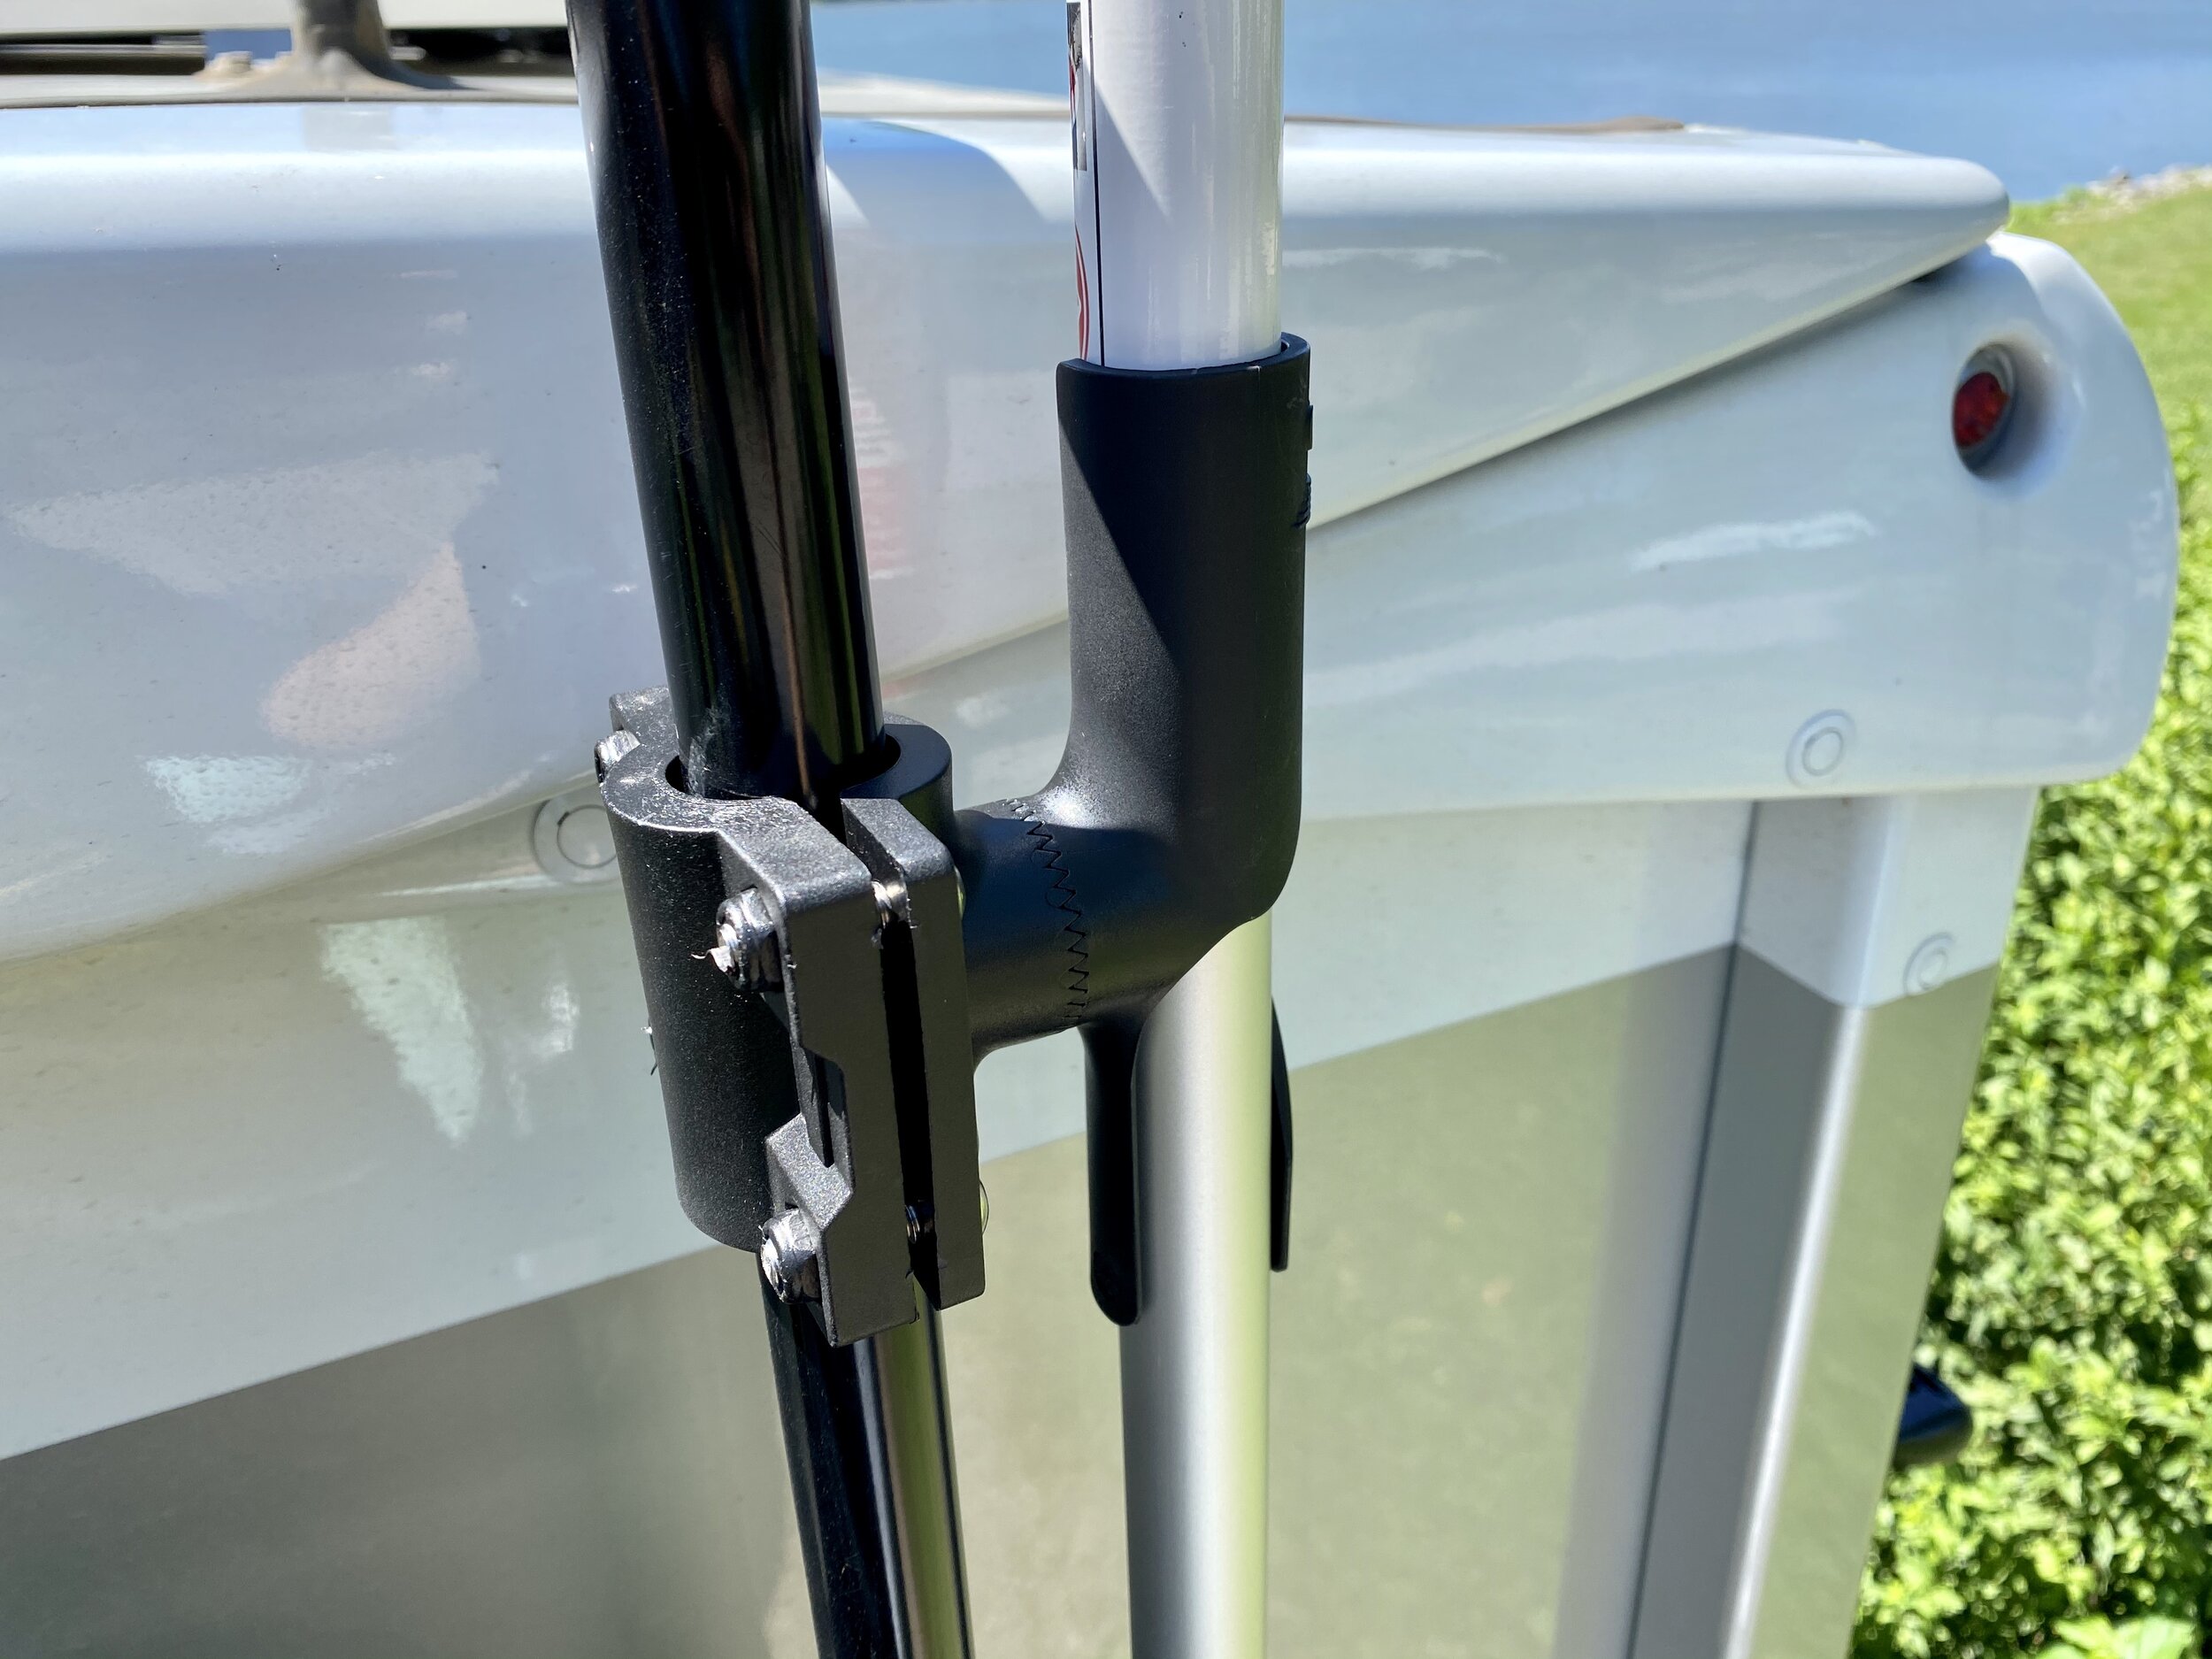
I bought the Flag Pole Buddy 1.0 aluminum pole that is 1” in diameter and extends anywhere from 6’ to 12’. In three of the photos, it’s mounted at the shortest length which puts the Wind & Rain gauge just above the roofline. A fourth photo shows the full 12’ extension which helps the sensors reach less disturbed air for more accurate wind readings. Note: the photo of the 1.0 aluminum flag pole on Amazon is inaccurate.
I modified the dark gray plastic mount that came with the Wind & Rain sensor to fit over the top of the flag pole. I sawed off the cylindrical part and used a small amount of 1” Gorilla tape to create the needed friction for a tight fit on the aluminum pole (see photos).
Storing Aluminum Pole, Wind & Rain Sensor
I store the aluminum pole inside the RV next to the bunk ladder (see photo). The base of the pole is behind the fire extinguisher and I secured the top to the wall with a Command Broom Holder Wall Mount. An alternative location is in the overhead bunk area, but I preferred the easy access of the stand-up location near the main door. None of my exterior storage bays could accommodate the 6’ long pole.
The wind/rain sensor is fragile and is best put away in a dedicated container. I found one made by Very Useful Box that fits perfectly (9L size, linked below). I added a bit of clear packing material at the bottom of the box for padding. I store the clear box in the outside rear compartment on the passenger side (closest to the exterior ladder).
Weather Station: www.amazon.com/dp/B07VNP2HFB
Weather Station User Manual: https://bit.ly/340EpjK
Additional Temp/Humidity Sensor: www.amazon.com/dp/B07QCTPX3L
Water Leak Sensor: www.amazon.com/dp/B07THLW9PN
Sensor Protection Shield: www.amazon.com/dp/B00VSXENM4
DC to DC Buck Converter: www.amazon.com/dp/B07WQJ2GD6
Flag Pole Buddy 1.0: www.amazon.com/dp/B001BUCM5E
Command Wall Mount: www.amazon.com/dp/B00U82D0PM
Command Picture Hanging Strips: www.amazon.com/dp/B073XV1P16
Clear Storage Box for Wind/Rain Sensor: www.amazon.com/dp/B005KAOMSQ
Wire Noodler Kit: www.amazon.com/dp/B01LXCJSRP