Mod: Lithium Batteries + 3,000w Inverter


DETAILS: Lithium Batteries + 3,000w Inverter
This upgrade has made one of the most significant day-to-day improvements to the RV experience. There is a good reason why Lithium batteries and higher capacity inverter/chargers are becoming the norm in newer coaches! Amazingly, when comparing this new installation in my 18J to the setup offered in the 2023 View/Navion, my inverter/charger has 50% more power and it can charge my batteries at more than twice the speed! This is a major upgrade.
I’ve been putting the system through the paces in the 125 days since I installed it, and I believe it’s robust, dependable and directly repeatable for those that are interested in the same upgrade. In fact, I helped a friend do the identical install in his 19J and his system is running equally well. Despite this success, I can’t predict the compatibility and performance of any other set of components other than the ones I integrated, though I’m sure other choices could be made. The specifications of batteries, cables and inverters all vary and so will their performance when combined. As such, I can’t make any guarantees that everyone will enjoy the same success, even if my system is duplicated exactly.
I need to emphasize upfront that this modification is very involved and should only be performed if you’re very comfortable with electrical components. And, to state the obvious, it’s critical to read the manuals for all components and not just depend on the high level overview that I share in this post. While this appears like a detailed step-by-step guide, there are many important things in the product manuals that I don’t have the space to mention here.
Features and Functions Overview
I had several goals when upgrading to Lithium. First, I wanted to run my entire coach on batteries — all electrical outlets and all appliances, including both the microwave and air conditioner. To gain this functionality, it required not just Lithium batteries, and not just a larger inverter, but new battery cabling and inverter wiring (details below).
Other benefits gained by upgrading to Lithium include lighter, smaller batteries that maintain their voltage even when under heavy load. They can also be drawn down to as low as 20% state-of-charge without damage. And they can be recharged very rapidly. The battery chemistry does, however, require some other changes to the RV electrical system, including the addition of a DC/DC charger, replacing Trik-L-Start with the latest generation Amp-L-Start as well as changing some other settings in the RV. Done right, Lithium is not a drop-in replacement!
In the process of this upgrade, it was important to me to keep the form and function of the installation as close to OEM as possible. I wanted to keep it simple and eliminate the need for additional switches, dials, etc. I also wanted to preserve the storage areas in my outside compartments. At a glance, there is no sign inside the RV that anything has changed — I like that! Additionally, I wanted to keep the new batteries in the original location, and likewise with the new inverter.
I’ll outline the entire process and all components herein, including links to the tools and everything I purchased (located at the very bottom of this page).
Whole House Inverter Details
When I turn on my new inverter, the RV acts like it’s on shore power. Everything works. Every outlet, every appliance. Even the microwave and air conditioner can run at the same time. It’s just like I’m plugged into 30 amp service at a campground!
This functionality stems from how the new batteries and larger inverter are wired into the coach. Instead of the shore power cord feeding directly into the 120vac distribution panel (circuit breaker box), the shore power cord is first wired through the inverter in/out and then to the distribution panel. The end result is that every outlet in the coach works all the time when the inverter is on, including the microwave and air conditioner. Even the electric water heater and 3-way fridge work on AC mode. With the new wiring design, the coach doesn’t know whether it’s being powered by the generator, shore power, or Lithium batteries.
That said, it’s very important that it’s managed correctly. Unlike shore power or generator, the batteries can be run down relatively quickly based on the load, so even though you can run everything, you need to manage it (much like managing fresh water differently when boondocking vs. with full hookups).
My new inverter is the Xantrex Freedom XC Pro 3000w Inverter/ 150a Charger which also has a built-in 50 amp ATS (automatic transfer switch). Since the shore power cord passes through the inverter, the transfer switch can automatically handoff power from the batteries (inverter) to the campground after you plug-in, or vice versa. One instance when this would come in handy is if a campground loses power in a storm and you’re in the middle of watching a movie, cooking in the convection oven, or running your air conditioner, the inverter will instantly (and seamlessly) take over and “transfer” power to your batteries. When shore power is restored, the inverter will again seamlessly transfer it back. If you don’t want this to occur, then you leave the button on the inverter remote “out” which is the standard/off configuration (more operational details below). Click here for the inverter/charger manual, and click here for the remote manual.
Flow of Electricity
The original 120vac factory wiring flows as follows when plugged into shore power:
Shore Power > 30 amp Distribution Panel
When wired as shown in the photos, the 120vac flows as follows when plugged into shore power:
Shore Power > EMS > Inverter IN > Inverter OUT > 30 amp Distribution Panel
When running on batteries (inverting), the flow of 120vac starts at the inverter powered by the batteries (indicated by bold below):
Shore Power > EMS > Inverter IN > Inverter OUT > 30 amp Distribution Panel
Since all sources of 120vac pass through the inverter — whether it’s provided by shore power, the generator, or the batteries — the function of the RV’s electrical systems are consistent irrespective of the power source. This is the game changer with this mod! When you start up your generator, or plug in to shore power, the flow of 120vac electricity gets passed through the inverter and automatically takes over thanks to the built-in ATS (automatic transfer switch). More details on this feature below.
Wiring Labels in Photos
To make it easier to follow along, I’ve digitally labeled the wires in the photos with unique (but ultimately random) yellow capital letters. Every letter, no matter which photo it’s in, is referring to the same wire/cable.
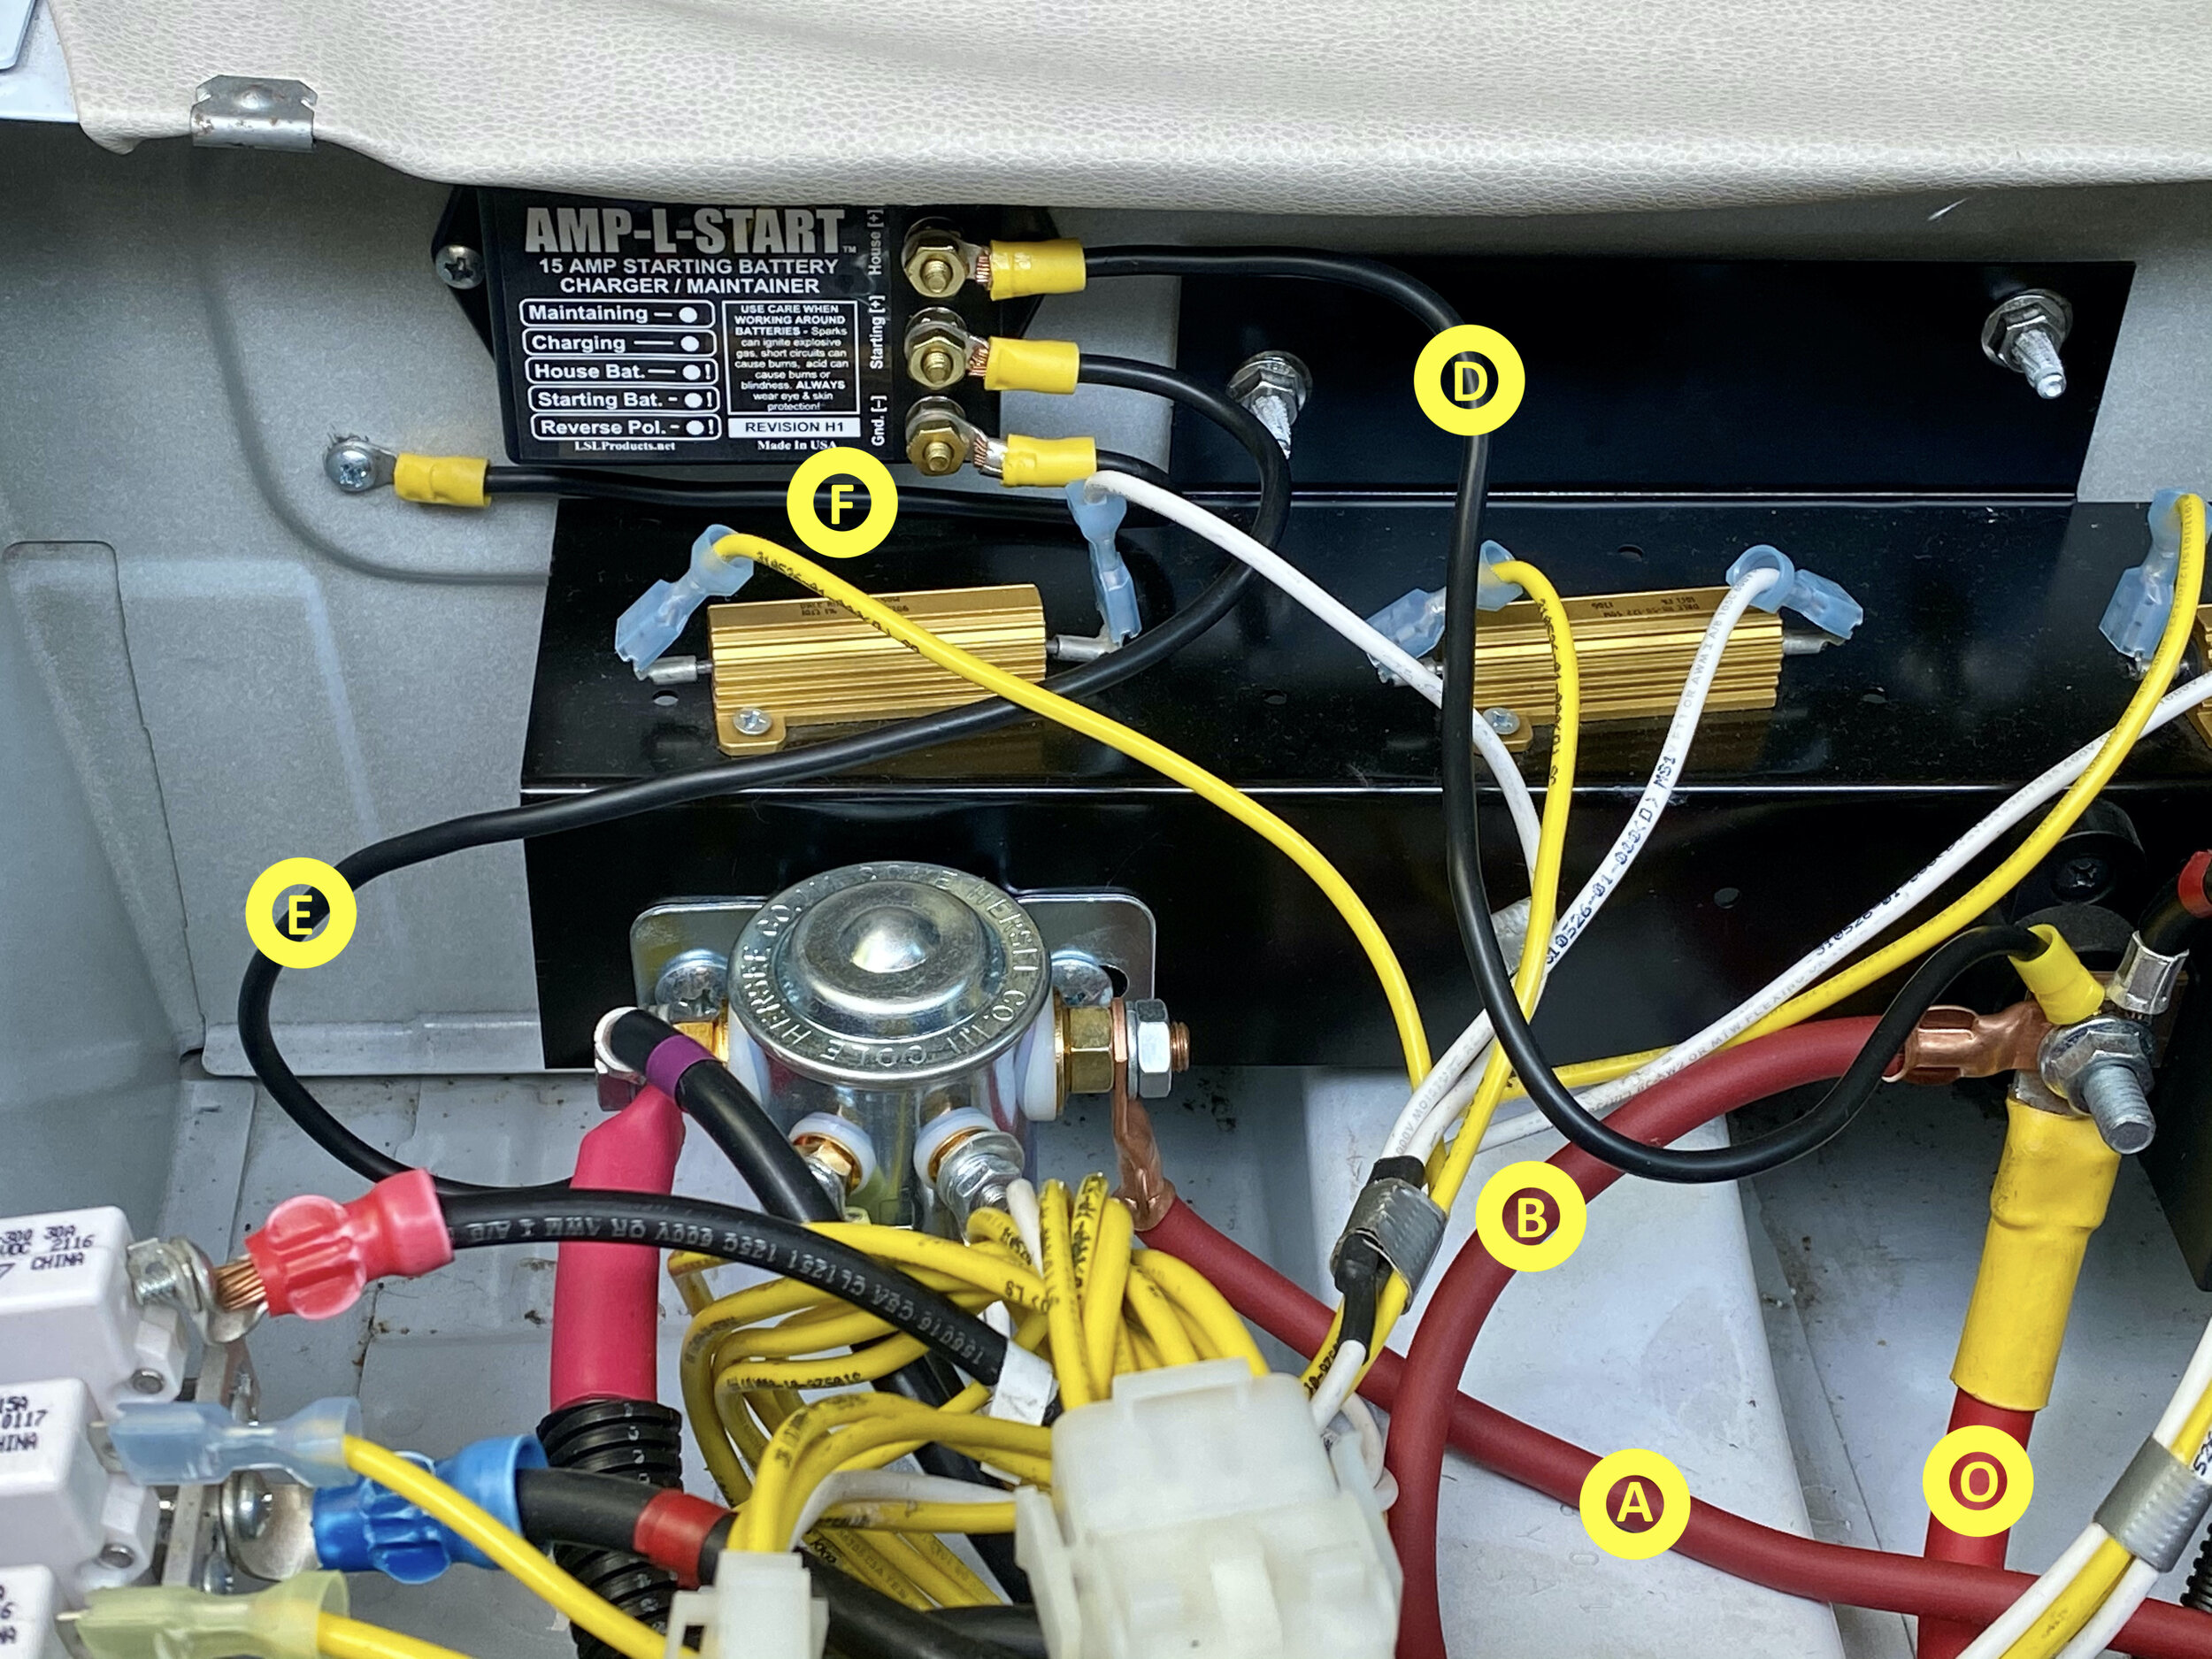
A: Connects DC/DC “In” to Boost Solenoid (6 AWG stranded wire)
B: Connects DC/DC “Out” to Coach Battery Disconnect Relay (6 AWG stranded wire)
C: Connects DC/DC “Ground” to Chassis Ground (6 AWG stranded wire)
D: Connects Amp-L-Start “House” to Coach Battery Disconnect Relay (12 AWG stranded wire)
E: Connects Amp-L-Start “Starter” to Boost Solenoid (12 AWG stranded wire)
F: Connects Amp-L-Start “Ground” to Chassis Ground (12 AWG stranded wire)
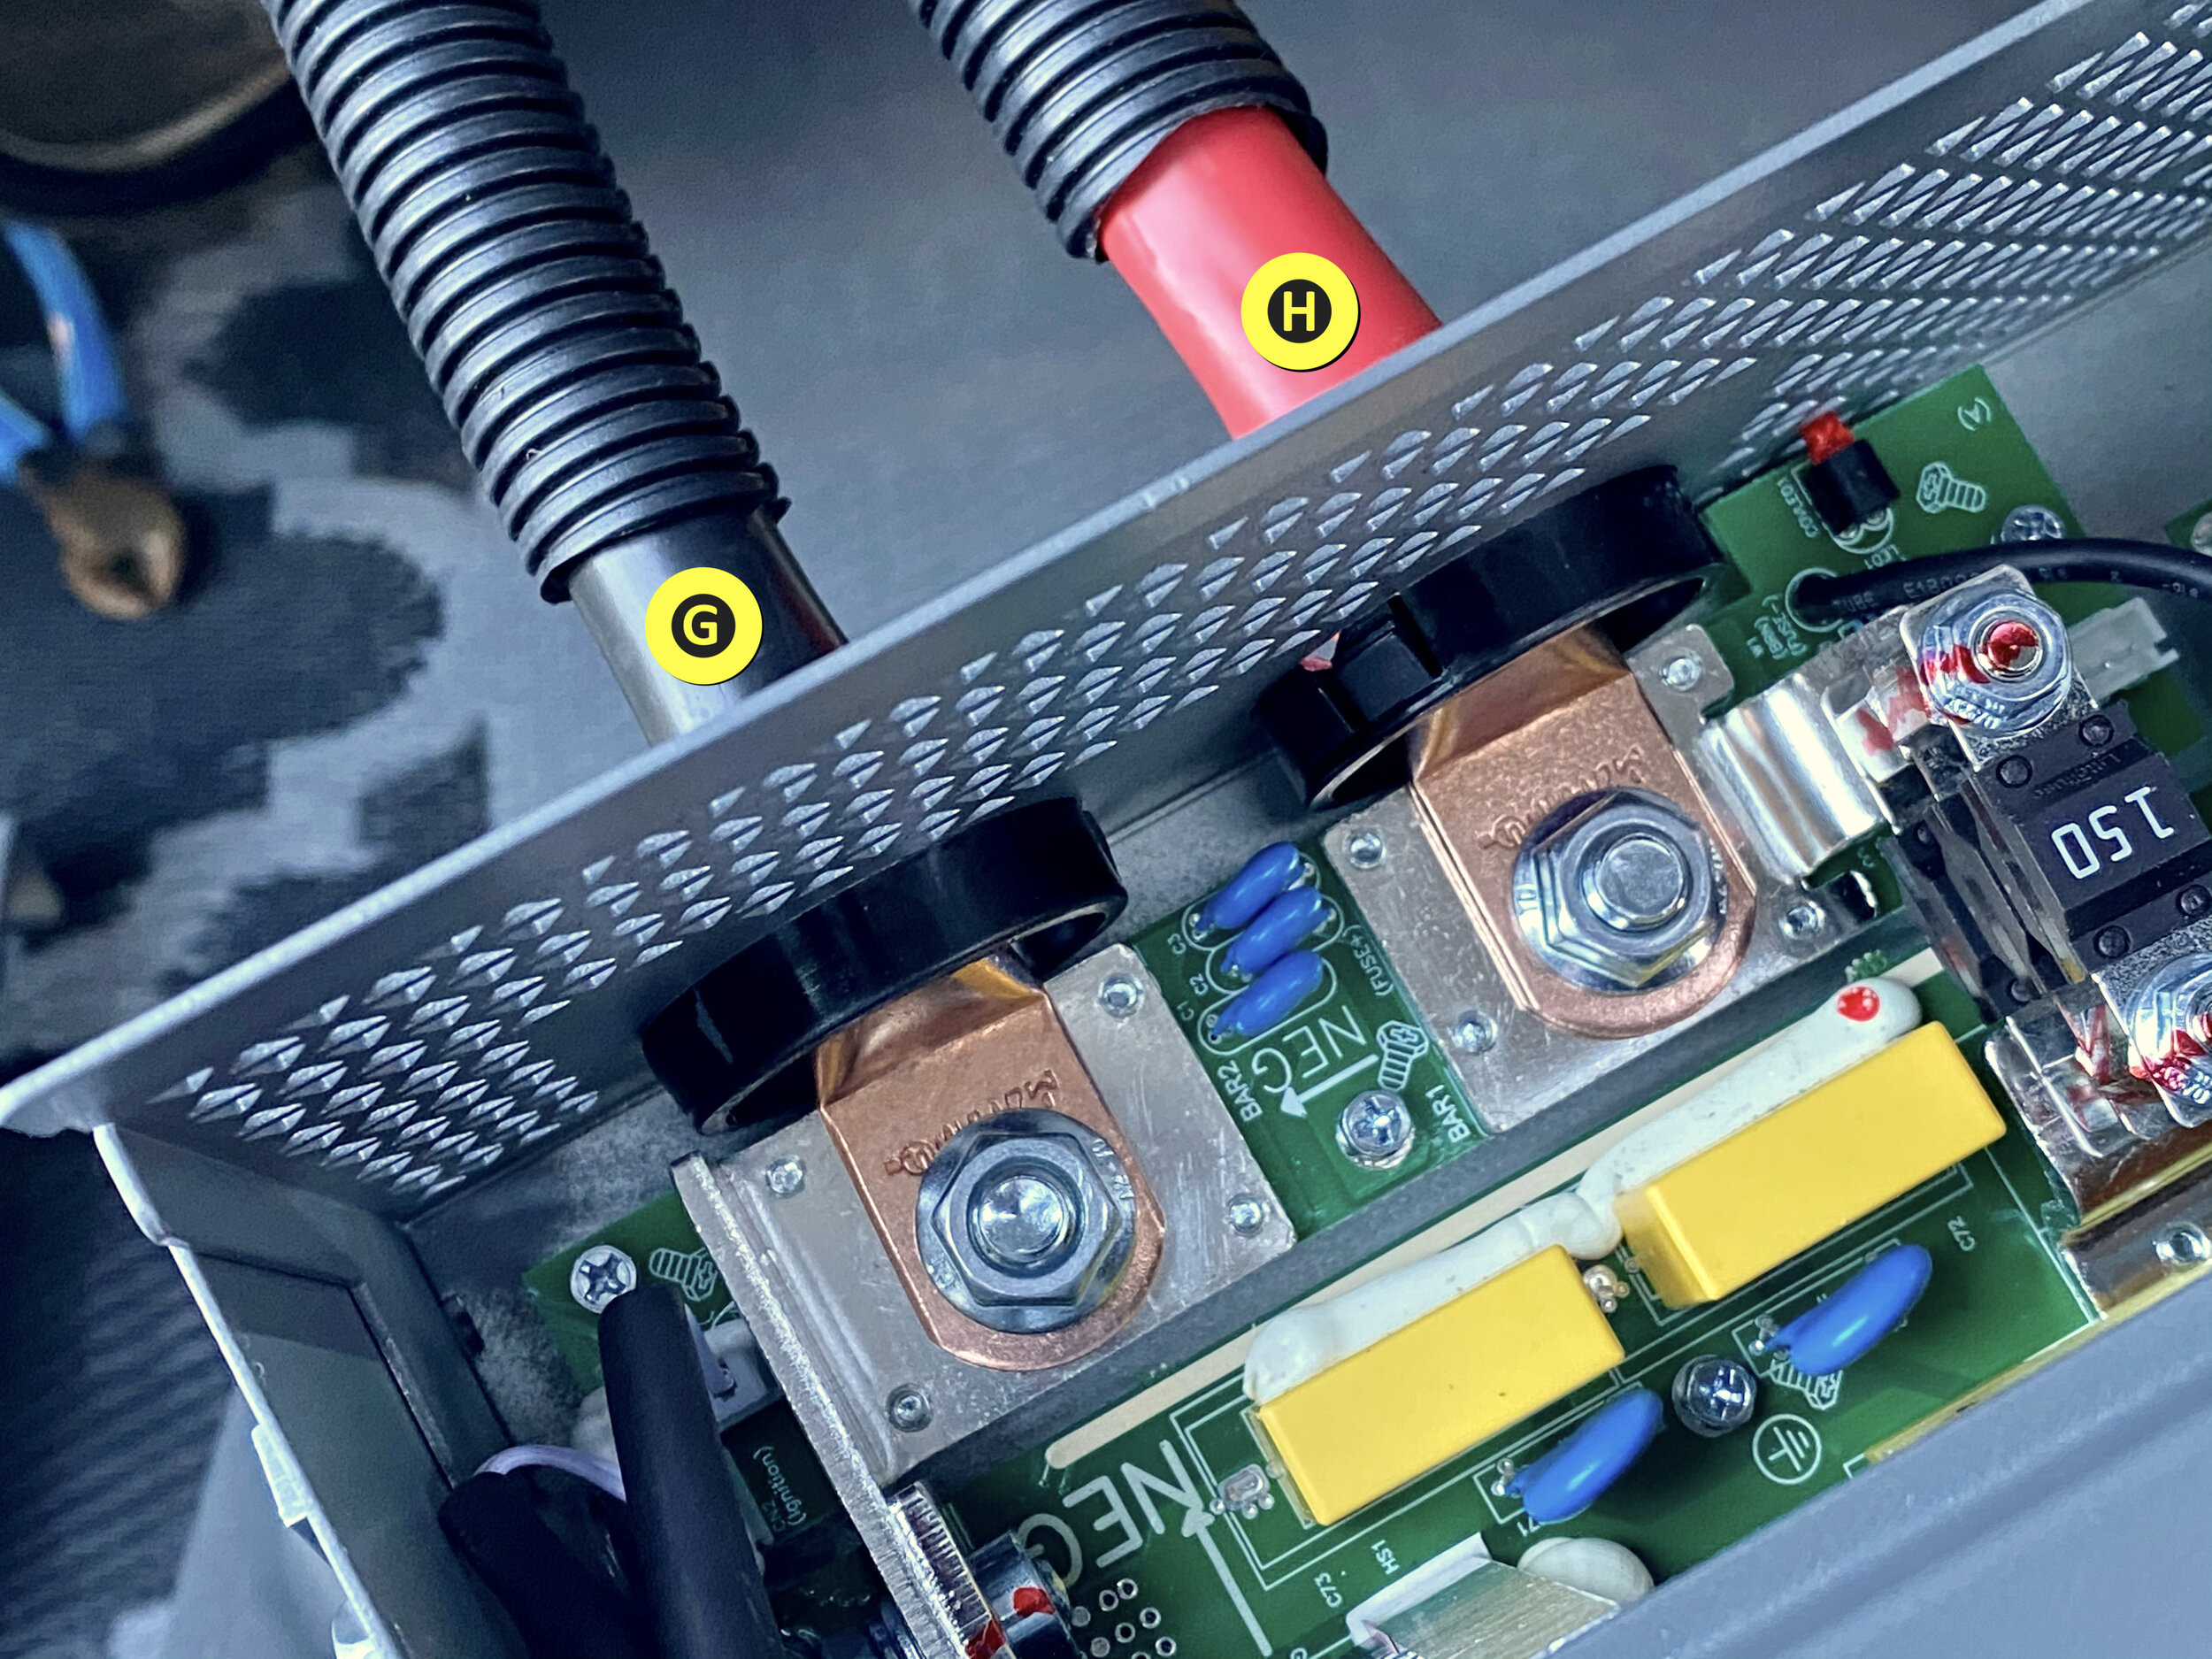
G: Connects Inverter NEGATIVE to Victron Battery Monitor Shunt (2/0 AWG welding cable)
H: Connects Inverter POSITIVE to 350 amp fuse in battery box (2/0 AWG welding cable)
I: Connects Inverter AC OUT to main 120v AC distribution panel (10 AWG Romex)
J: Connects Inverter AC IN to shore power cord or EMS OUT (10 AWG Romex)
K: Connects 350 amp fuse to battery 1 positive (1/0 AWG welding cable)
L: Connects 350 amp fuse to battery 2 positive (1/0 AWG welding cable)
M: Connects SHUNT (battery side) to battery 1 negative (1/0 AWG welding cable)
N: Connects SHUNT (battery side) to battery 2 negative (1/0 AWG welding cable)
O: Reposition cable FROM Boost Solenoid TO the Coach Battery Disconnect (pictured) for DC/DC charger installation
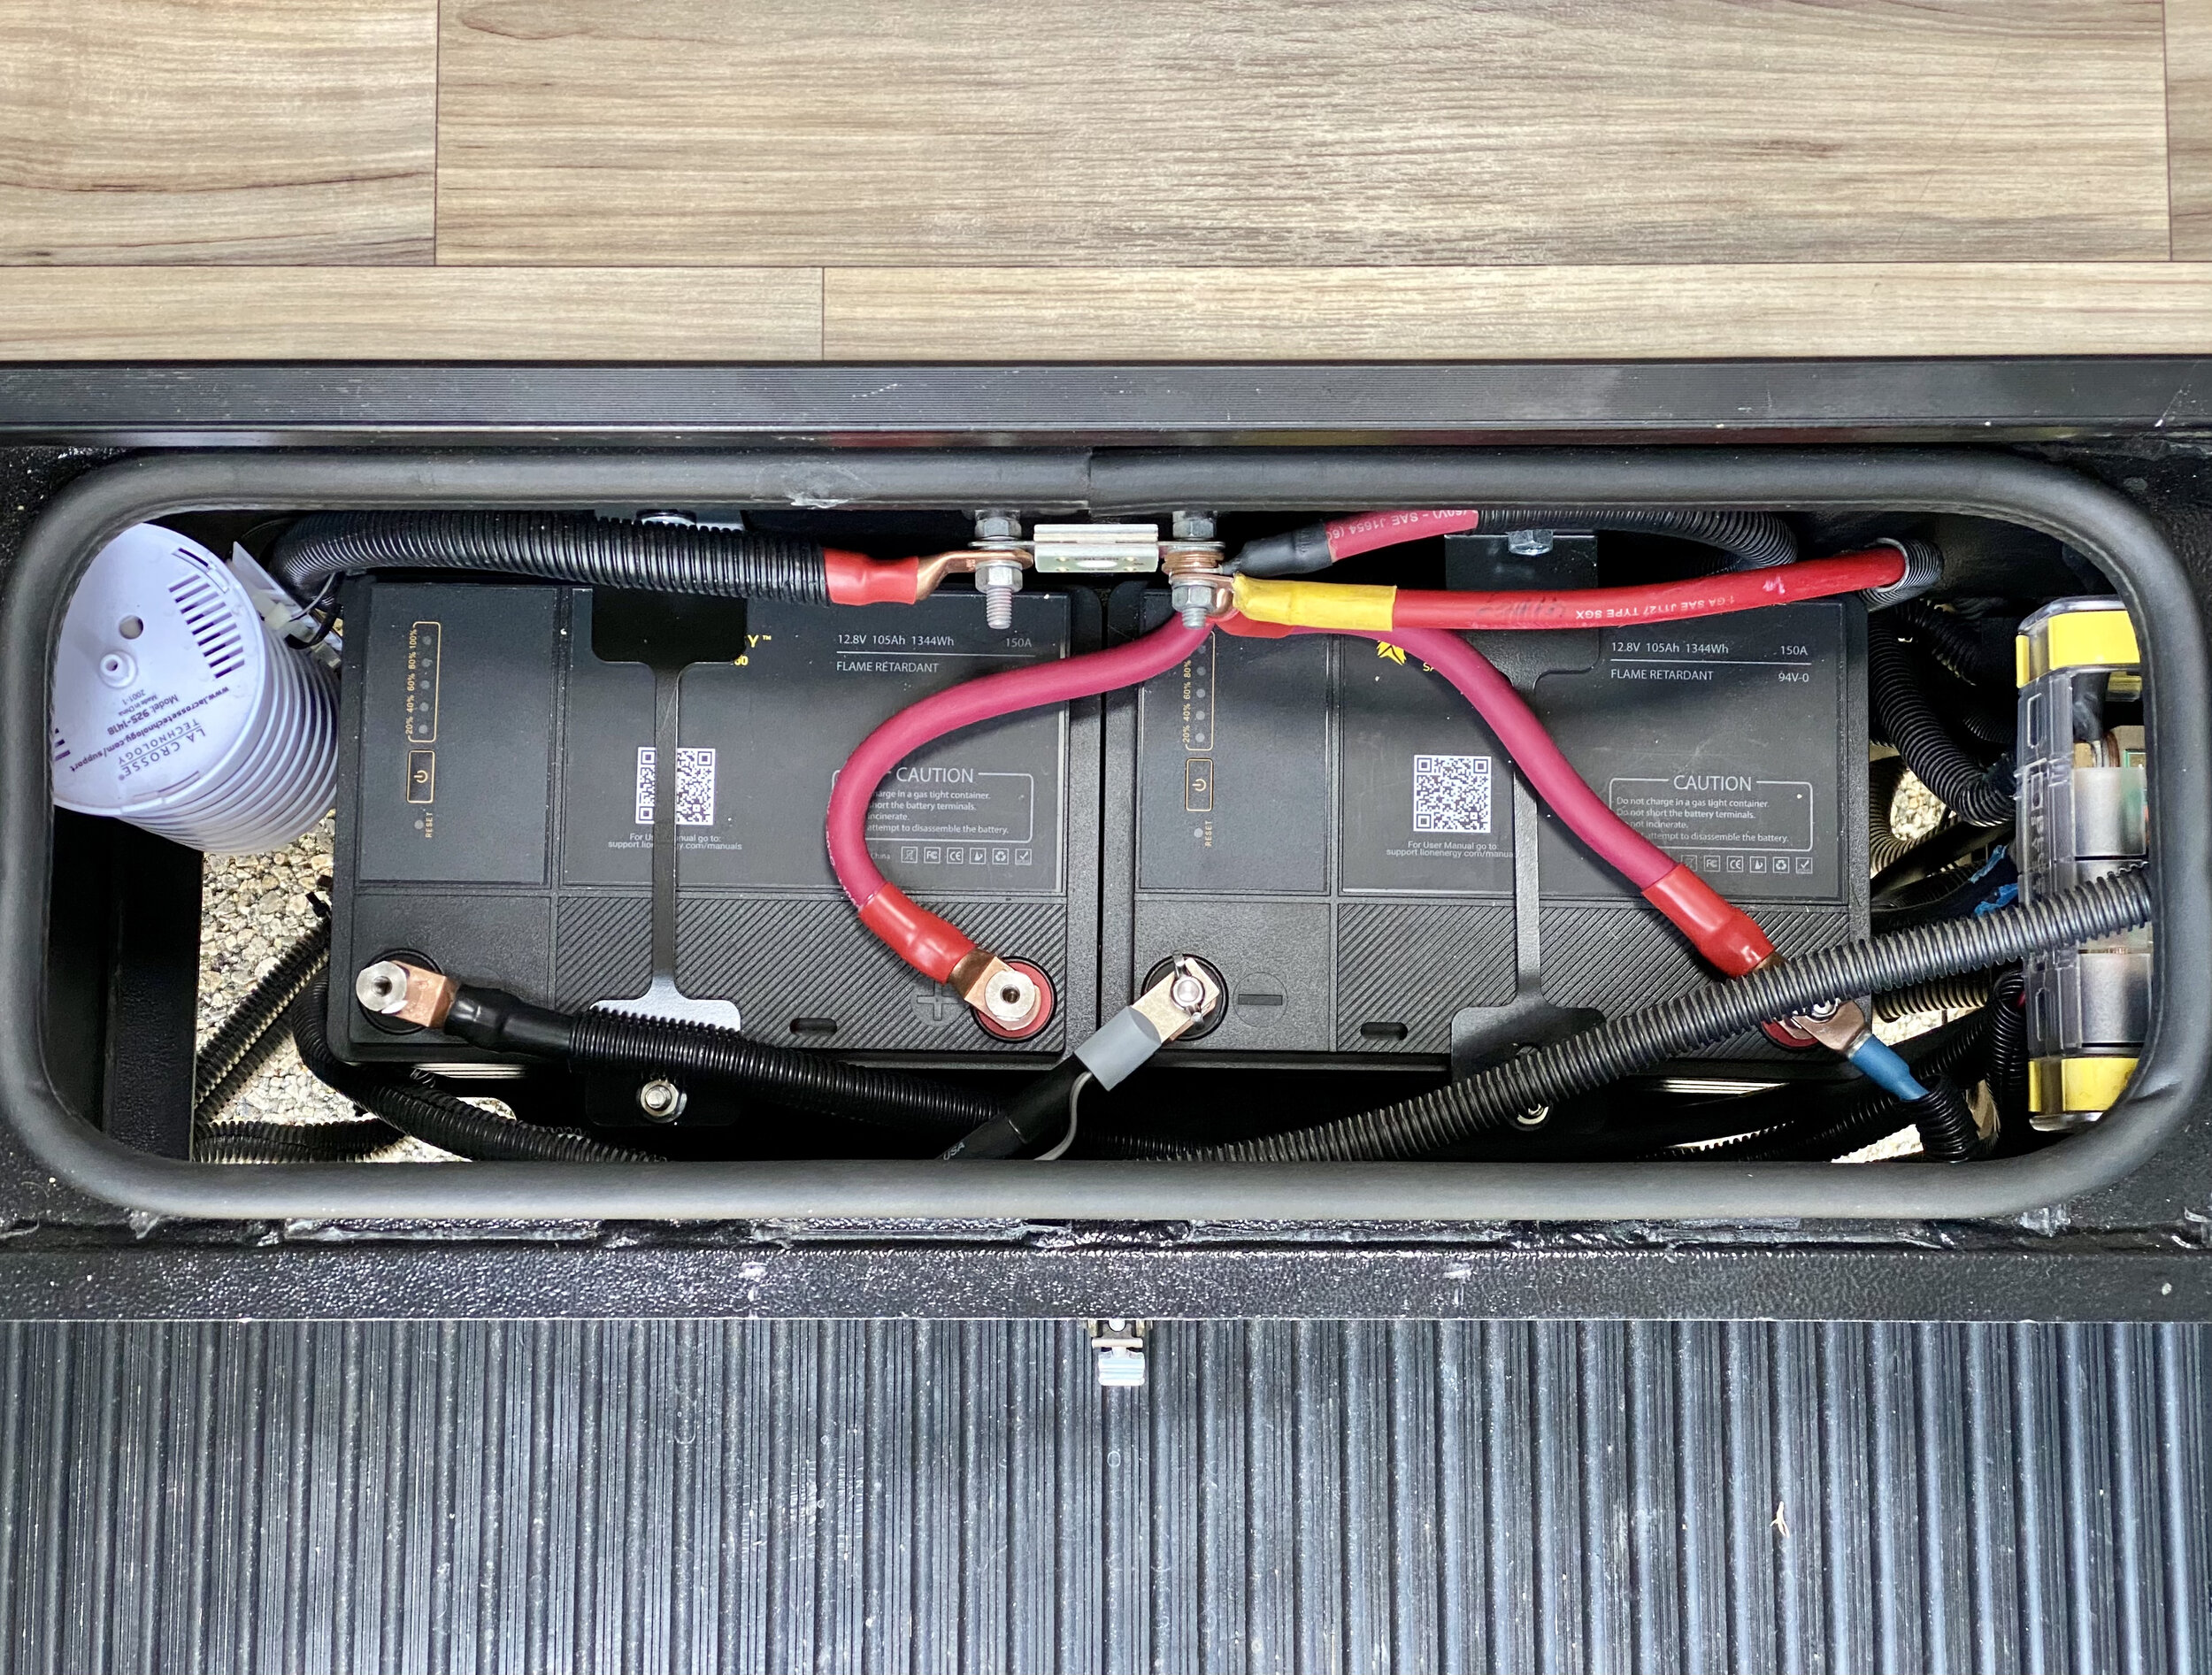
Lion Energy Safari UT 1300 Batteries
There are many considerations when it comes to choosing Lithium batteries for RV applications: capacity, size, weight, price, discharge rate, heater functionality, BMS, brand reputation, etc. I choose Lion for a few reasons, with Costco’s price, reputation and return policy being primary factors. Lion also has a slightly higher capacity (105ah vs 100ah) and greater continuous discharge rate (150 amps vs 100 amps) than some of their competitors. The batteries are guaranteed for 3,500 cycles, which means they can be fully charged and fully discharged 3,500 times, and then they would be rated for 80% of their capacity. If you charged and drained them every single day, they would last almost 10 years. If you averaged a full cycle every other day, they would last 20 years. Their warranty is cycle-related, not time-related.
Built-in heaters wasn’t important to me for various reasons which I’ll address below, and I knew of many success stories with this brand and have yet to hear anything negative from actual end users. I’m not saying better options don’t exist for a higher price, but I also don’t have anything bad to say about these batteries after 125 days of flawless performance under heavy testing. Look for an online deal on Costco to save approximately $300 per battery!
Lithium can be charged up to 14.6v, though Lion Energy says any voltage between 13.9v and 14.2v is appropriate and will top off the batteries. Lion’s write-up as it relates to the Victron battery monitor and MPPT Solar Controller specify 13.9v for the stated values. Click here for the explanation. Click here for the Lion Energy Safari UT 1300 manual.
Running the Air Conditioner on Lithium Batteries
Although the A/C can only run for a total of 60-90 minutes on this 210ah battery bank, there have already been several instances when I’ve used this new capability. First, when stopping for a break or making lunch at a rest stop, it’s an easy way to keep the coach cool without starting the generator. When I resume driving, my house batteries get recharged.
Another instance is when I’m traveling on a hot day and I go grocery shopping for 30-45 min. I run the A/C to keep the coach cool in my absence, otherwise the temperature inside the rig can rise 10-20 degrees very quickly if it’s in the direct sun on a summer’s day. If you travel with pets, this will really come in handy during these types of brief stops.
Another practical use of running the A/C on batteries is to pre-cool the coach during the last hour before arriving at a full hook-up campground. During the final part of a drive on a warm day, as well as during check-in, I’m now able to start cooling the coach without running the generator. When I proceed to my campsite and plug in, there is a seamless handoff to shore power, thanks to the Xantrex Freedom XC Pro’s 50 amp ATS (automatic transfer switch).
Running the 3-way Refrigerator on Inverter
Although the fridge is a power hog on the batteries when running directly off the inverter, there are two instances when I run my 3-way fridge on inverted 120vac. The first is when I’m getting propane filled. In the past, I would turn off the fridge (in addition to shutting the propane switches off). Now, however, I can just turn on the inverter and it will automatically switch to 120vac power, allowing it to keep running. This is very helpful in hot weather and when a propane stop takes longer than you expect.
Another instance when I run my fridge on 120vac (via the inverter) is when traveling on a ferry. It’s typically required to turn off your propane and shut off your engine. In the past, that meant my 3-way fridge was effectively turned off and no longer cooling. Now, I just turn on the inverter and confirm that my fridge is running on 120vac. I’ve taken 3 ferries since my Lithium conversion and it worked like a charm! This method would work equally well in tunnels, when required.
I have tested running the 3-way fridge on the inverter in AC mode when driving, but it’s only practical if your batteries are full. The amp draw is so significant and inefficient (vs. 12v mode or propane), you won’t be charging your house batteries at all while driving, just maintaining.
Lithium Converter
The primary function of a converter is to convert 120vac to 12vdc. With a converter, you can power all of the 12v functions of your RV when plugged in, even if you disconnect your batteries (or have completely dead batteries). You can test that your converter is working by plugging into shore power and turning on some lights. Then, turn “off” your coach with the battery disconnect switch by the main door — and your lights will stay on! That’s because once you plug into shore power, the RV’s 12v system (i.e. lights, etc.) is powered by the converter, not the batteries. If you then turn off your converter (by turning off the associated/labeled circuit breaker in the distribution panel), your lights will then shut off.
The secondary function of a converter is to charge your house batteries. A converter uses power from its 120vac source (either shore power or generator) and charges your 12v batteries while simultaneously running your 12v systems. This is the way it’s already wired from the factory (through model year 2019).
My coach came with a Progress Dynamics PD9245C multi-stage converter that was designed for lead acid batteries. It bulk charges at 14.4v and then drops down to a constant rate of 13.6v. While this charging profile is not technically enough to maintain Lithium batteries at a full charge, it will get them to a full charge if you buy and install the optional remote pendant. It’s a great option and I kept this original OEM converter in place for almost two years. You can not damage your Lithium batteries with a converter/charger designed for lead acid — only the other way around (don’t use a charger designed for Lithium on lead acid batteries!).
Progressive Dynamics now makes a similar, 45-amp two-stage model specifically for Lithium (PD9145ALV) that charges at 14.6v until full, and then drops to 13.6v. Prior to October 2021, the same make/model Lithium converter was a single-stage converter with a constant voltage of 14.6v. The Lithium battery industry apparently influenced Progressive Dynamics to modify the converter to two-stages. For whatever reason, Progressive Dynamics did not change the model number.
I waited for the revised version to come to market before installing. The two-stage version is only indicated by a physical sticker on the product itself and a serial number beginning with the following number or greater: 21272…
I also purchased and installed the optional remote pendant which allows me, at the push of a button, to enter boost mode (14.6v) to deploy/retract my slide without running the engine, or press and hold to drop down to 13.6v to reduce the amp draw if I need to run other high amp draw devices during a bulk charge.
Fast Charging with the Inverter/Charger
The Lion Energy batteries standard charging rate is 45 amps with a maximum charge rate of 100 amps. Since the batteries are both 12v and wired in parallel, you would set the Xantrex Freedom XC Pro charger setting to 90 amps for standard charging (it’s sending 90 amps to the battery bank, which is 45 amps per battery). If you were to set the XC Pro charger to 45 amps, then each battery is being charged at only 22.5 amps each. This won’t hurt anything, but it’s unnecessarily slow.
The charge rate of the XC Pro can be set in 5 amp increments from 5 amps all the way to 150 amps. When set to 150 amps, each battery receives 75 amps, which is well below the max rate of charge (100 amps per battery).
As a test, which I’ve done a few times, I’ve tried to see how fast I can charge my house batteries. I started my generator and set the XC Pro charge rate to 150 amps, then proceeded to drive. The chassis alternator with the DC/DC charger adds approximately 25 amps of charging. And during the day, when solar was active, I added another 20 amps for a grand total of 195 charging amps, or just under the max charge rate of 100 amps per battery. Amazingly, this brought my Lithium batteries from a state-of-charge of 25% to 100% in less then 50 minutes! I’ve done the same test at night (no solar) by switching on the OEM converter which generates about 25 amps. I realized the same incredible total charge rate (195-200 amps) as indicated in my Victron battery monitor app.
More practically, I’ve tested how fast I can charge my batteries via my generator when boondocking. Overnight, I ran my batteries down to 21% state-of-charge. Since the capacity of each Lion Energy battery is 105ah and they are wired in parallel, the battery bank capacity is 210ah. I ran my house batteries down to 21% state-of-charge, which means I used 79% of their capacity and I was 166ah down from full (210 x .79 = 166). I then proceeded to start my diesel generator from the Lithium batteries while at 21%, and it started immediately! I set my XC Pro’s charge setting to max (150 amps). To simulate a cloudy environment or a boondocking location in full shade, I disabled my solar. My batteries went from 21% to 99% in 75 minutes! If it was sunny out, or if I was driving while running my generator, it would have taken less than an hour!
Gone are the days of running my generator a couple hours in the morning and a couple hours in the evening.
Wiring Batteries, Inverter & Fuse
The first step is disconnecting both your house batteries and chassis battery. Remove the house batteries, old inverter as well as the battery cables that previously connected them to each other. You can repurpose the black/ground cable that connected the OEM inverter negative to the chassis (more on this below).
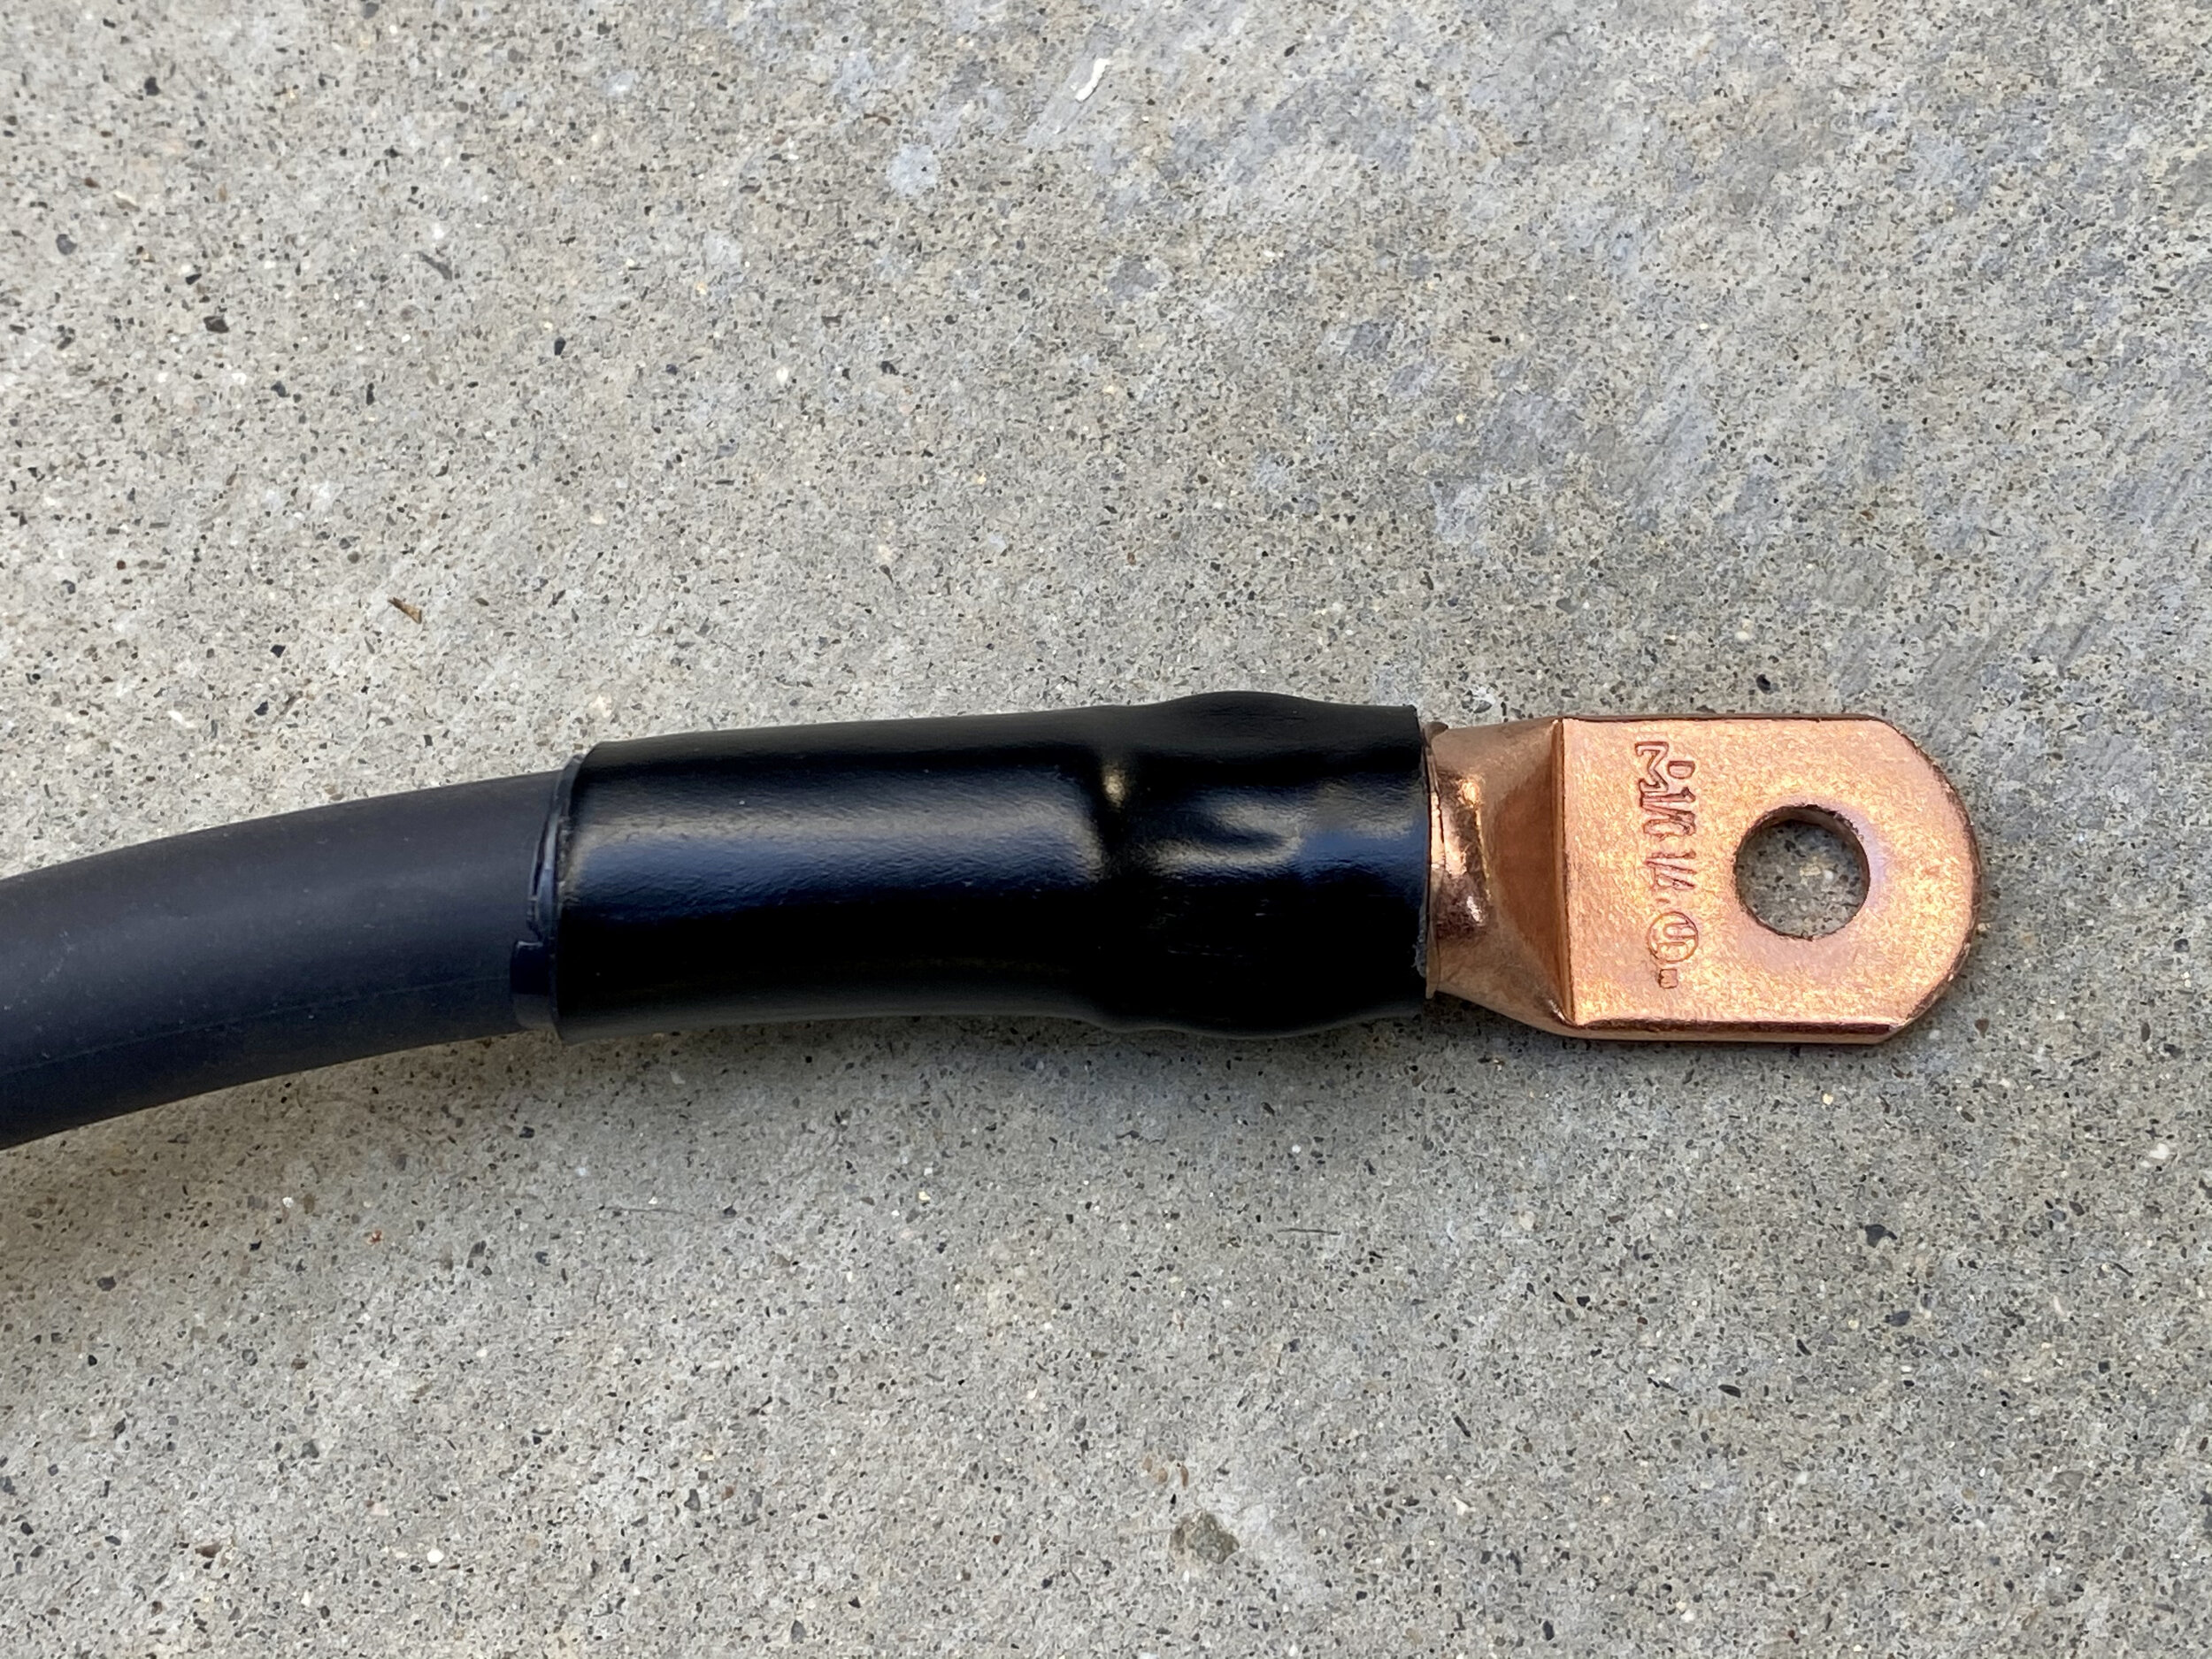
When referencing charts that specify wire gauge size based on length of runs and flow of amps, it was determined that I needed 2/0 AWG between the new inverter and the battery bay, and 1/0 AWG within the battery bay when wired with equal length cables for both batteries (see photos for wiring details). The largest cable that previously existed in the OEM installation was 1 AWG (which is smaller). I created a total of 6 custom battery cables using welding cable. It’s more expensive, but much more flexible and easier to bend.
I started the wiring job at the inverter. I carefully removed approximately 1/2” of insulation from the 2/0 AWG cable using a razor blade (see photo). I would recommend deeply scoring the insulation, but not actually cutting all the way as you may compromise the wire. I used pliers to twist off the insulated end. Then, slip a 2/0 AWG lug that has the smallest size ring terminal that will fit over the post on the inverter (all lugs used are linked below). Use a hydraulic battery cable crimper to make each connection. To learn how to properly crimp battery cables, check out this 7-minute YouTube video. Then, use heat shrink tubing and a heat gun to complete the job, also shown in the video.
On the 12v negative terminal of the inverter, add two lugs — first, the new 2/0 AWG cable and then the original OEM negative cable/lug that was previously attached to the OEM inverter (the other end is connected to chassis ground). It’s important to put the larger cable/lug on the post first which will be closer to the inverter contact plate. The smaller OEM lug will then be on top, closer to the nut.
While still working at the inverter, connect 10 AWG Romex electrical wires to both the AC IN and AC OUT. This orange Romex wire will be run to the distribution panel (circuit breakers), replacing the smaller gauge white Romex that was part of the OEM installation. Strain relief clamps at the back end of the inverter are required and sold separately (see photos). I bought 3/4” strain relief clamps at Home Depot to accommodate the large 10 AWG wire. In order to fit the strain relief clamps into the holes, you need to remove the metal knockout rings on the back of the inverter (I used needle nose pliers with some twisting action). Clearly label the other end of the 10 AWG Romex cables “AC IN” and “AC OUT”. Reuse the small ground wire from the old inverter and attach to the grounding lug on the side of the XC Pro.
I ran all wires and cables through split loom conduit. The Romex fit in 1/2” black conduit, and the 2/0 AWG battery cables fit snugly inside 5/8” black conduit. Carefully feed the entire length of the 2/0 AWG battery cables through the hole in the back of the inverter compartment, and the orange Romex should follow the same path as the previous OEM white Romex. In my rig, it was through the ceiling of the compartment to the area below the galley drawers. You’ll ultimately want to create custom length cables, but the length can’t be determined until both the inverter is mounted and the batteries are in place. You can now proceed to mounting the inverter to the ceiling of the compartment (outlined in the next section).
Xantrex sells an optional battery temp sensor that attaches to the negative terminal of a battery on one end, and the back of the inverter on the other. This sensor influences the charging voltage based on temperature.
Next step for the battery cables: pass them underneath the rig along the same path as the previous battery cables (behind the compartment). I used multiple heavy duty zip ties to secure them. Run the cables into the battery compartment. The inverter positive cable will terminate on the left side of the 350 amp inverter fuse (see photos). The inverter negative cable will terminate on the “load” side of the battery monitor shunt. If you don’t already have the Victron BMV-712 Battery Monitor or Victron SmartShunt, now is a great time to install one. Click here to see my detailed write-up. With Lithium batteries, it’s even more critical to have a battery monitor since battery voltage is no longer a dependable indicator of state-of-charge.
Decide how much slack you want in the battery cables in case you need to remove the inverter and/or move things around in the battery compartment in the future. Keep in mind that the longer the cable, the more the voltage will drop. Measure twice and cut once using a set of cable cutters to cut both of the 2/0 AWG cables. Crimp the ends with the appropriately sized 2/0 AWG lugs that have the smallest size ring terminal that will fit over the termination post (all lugs used are linked below).
Now, the batteries. Instead of running a single positive cable connecting the right side of the 350 amp inverter fuse to one of the positive terminals, and then adding a jumper from that positive terminal to the other battery’s positive terminal, there is a more balanced method. Run two equal length cables from the fuse to the positive terminal on each battery (see photos). This keeps the batteries in balance and also reduces the load of each cable to approximately 50%, which is why these cables can be 1/0 AWG instead of 2/0 AWG. Custom make the longer 1/0 AWG cable first, then make an identical cable for the second battery. Use the smallest 1/0 AWG ring terminals that will connect to the lowest part of the post (which I believe are 1/4”). Do the same for the negative battery terminals, making two equal length 1/0 AWG cables that connect each negative terminal independently to the battery side of the shunt (in the photos, one of the negative cables is almost completely out of sight).
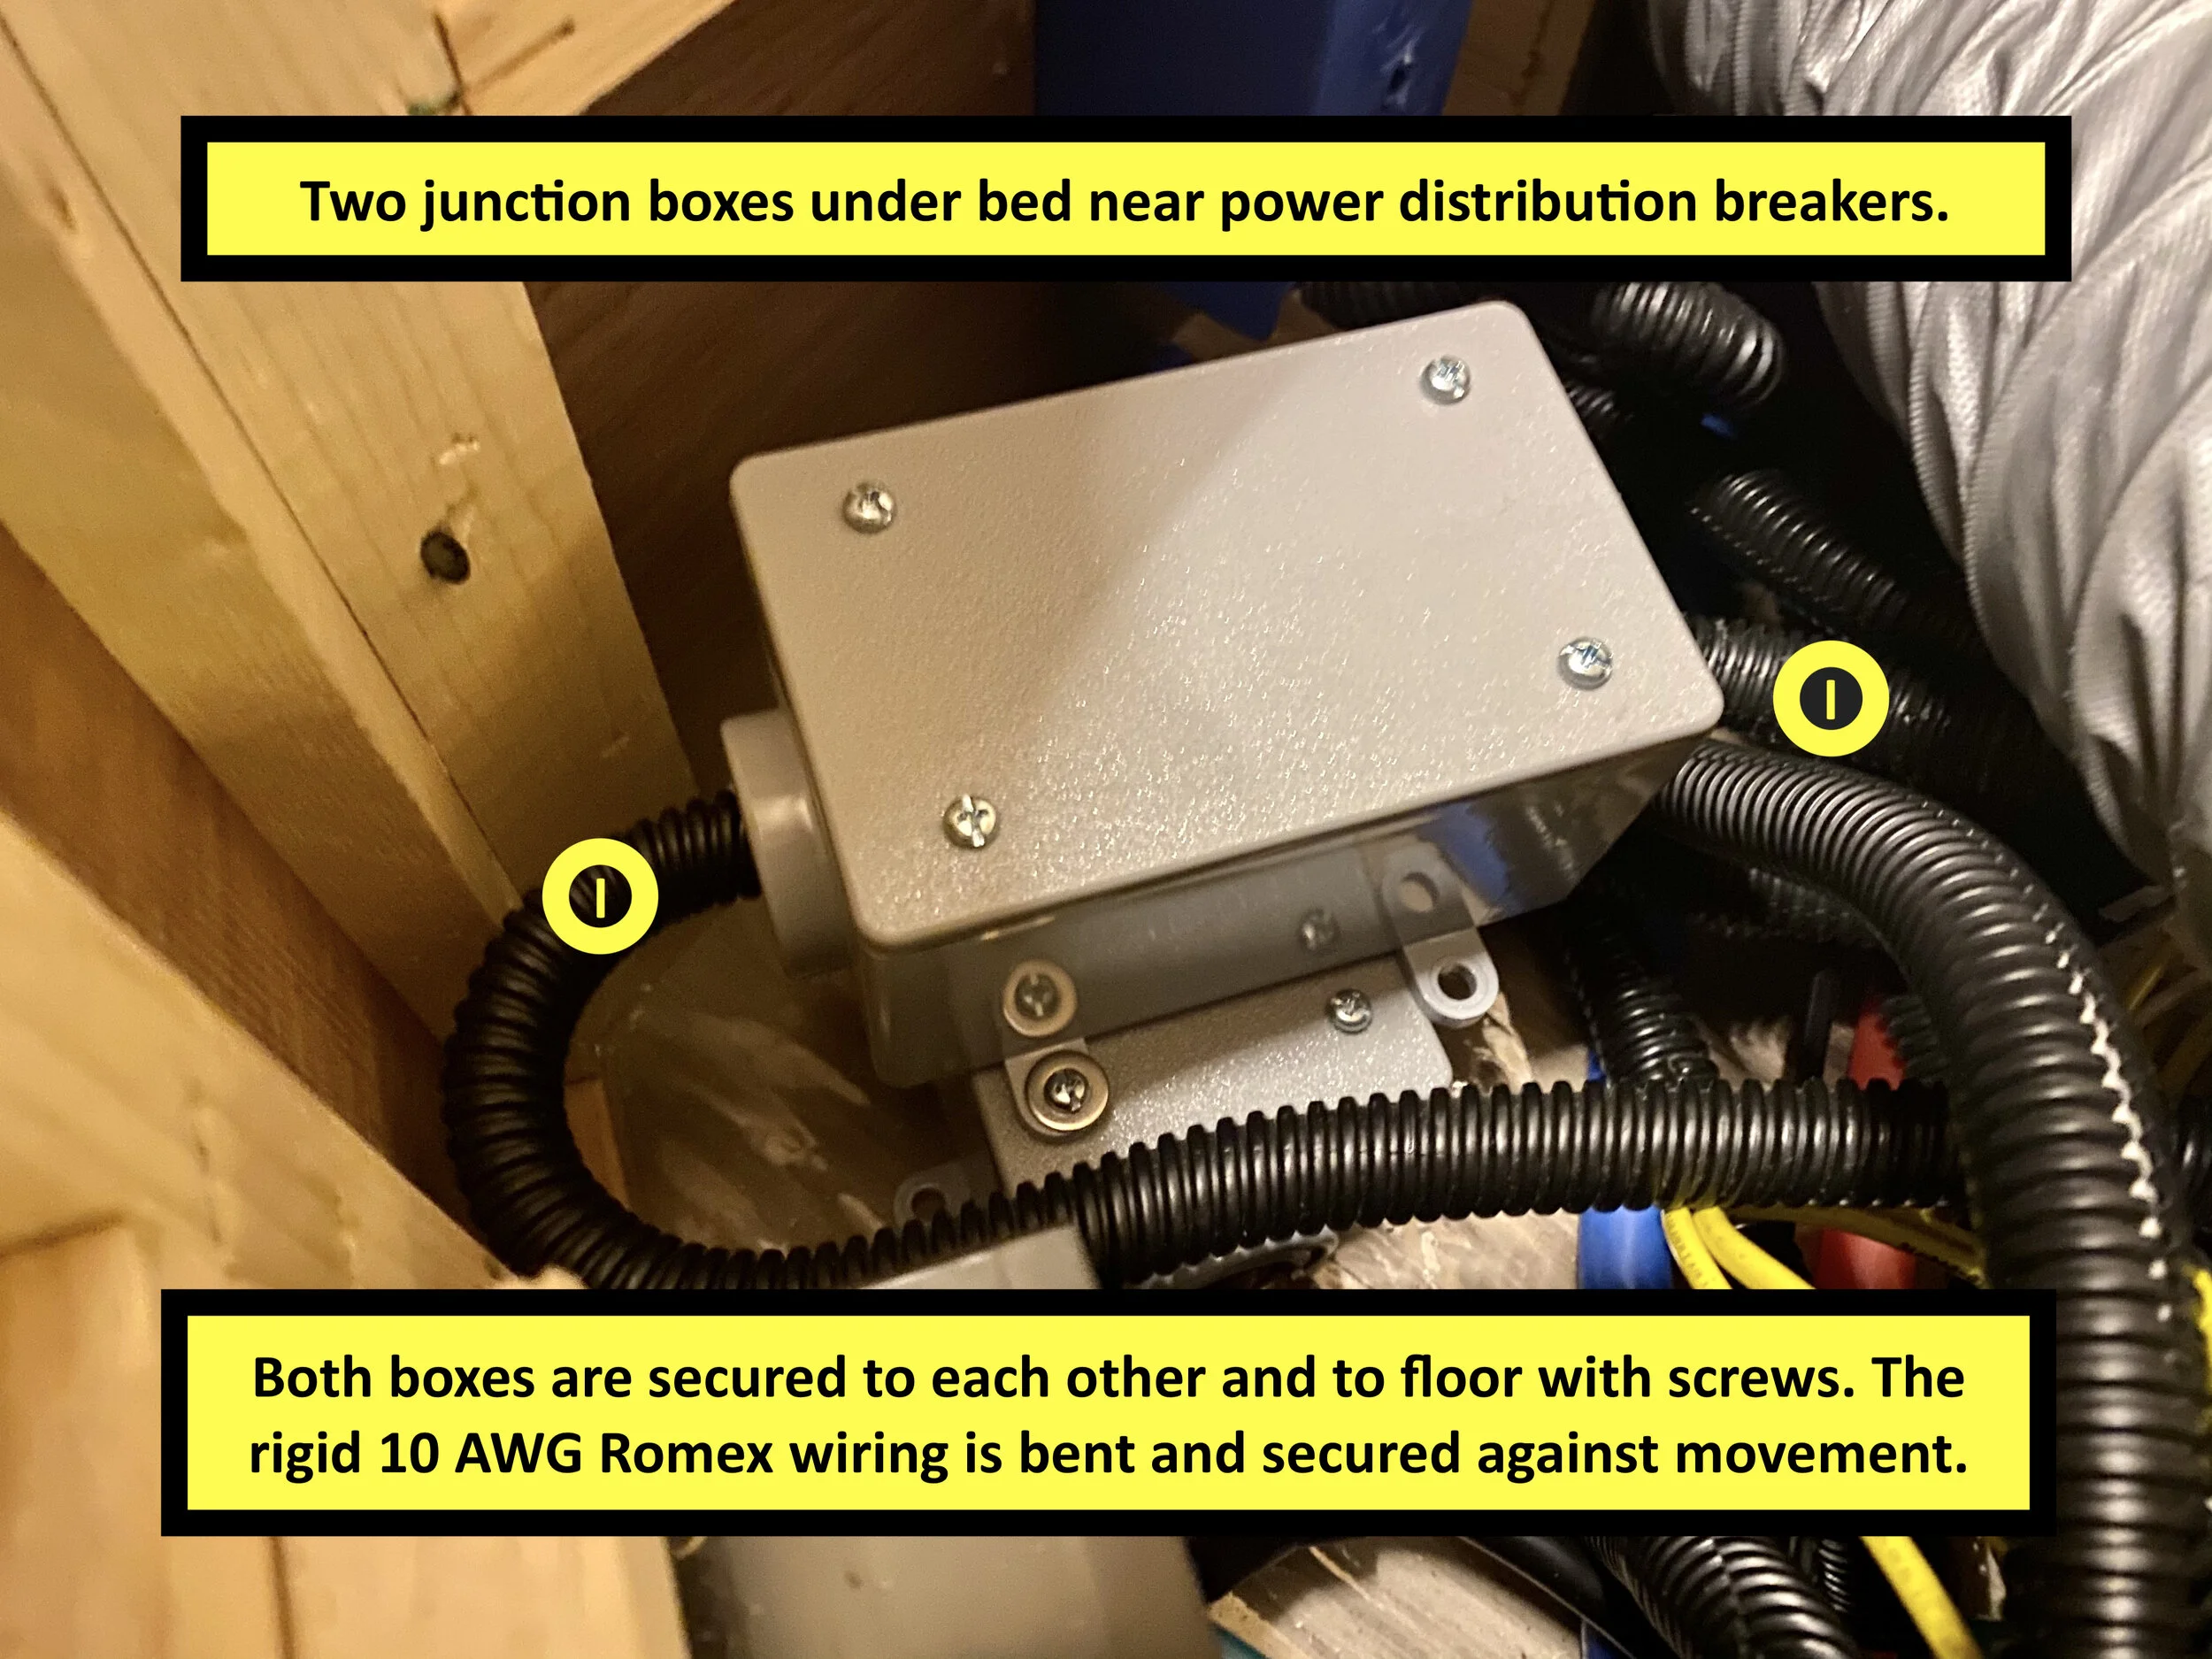
The 10 AWG Romex needs to be fished along the path of the original Romex — all the way to the area behind the distribution panel (circuit breakers). In the J model, this path is under the galley drawers, under the fridge, through the water heater compartment and then under the corner bed.
The next step is a big one! Proceed very carefully and be certain that you’re comfortable with this step and identify the correct wires before committing.
You’ll need to cut the OEM orange Romex that feeds from the shore power cord junction box in the service bay to the top position of the distribution panel (with the 30 amp breaker). The resulting wires coming from the shore power cord junction box will be connected to the new AC IN Romex from the inverter or to either end of an EMS if you have one (more details below on this option).
The wire coming from the 30 amp breaker will be connected to the AC OUT Romex from the inverter. Alternatively, you could wire the AC OUT straight into the distribution panel to make it clean. In the photos, I used WAGO 221 connectors to join the wires. I bought two plastic junction boxes at Home Depot to house the connections. It’s important to secure the junction boxes to the RV so there is no movement of the wires or connections.
The last step is connecting the old white Romex wires that previously passed through the inverter bay. The cleanest, and safest, way to do this is to trace them back as far as possible to the area near the distribution panel. The only reason they are long is to make it to and from the inverter compartment for the old inverter. I pulled them out and traced them both under the bed. These white Romex wires need to be connected to each other to restore their circuit. I used a plastic junction box and WAGO 221 connectors for this task (see photo).
UPDATE: I’ve since eliminated the junction boxes and WAGO connectors, terminating the Romex wires directly at the distribution panel. With proper installation, either way is equally safe and effective, but it’s a cleaner install to not use the junction boxes.
Xantrex Freedom XC Pro Inverter/Charger: Mounting and Installation
I mounted the inverter in the same location as the original (ceiling of the compartment behind the steps). The OEM inverter was simply screwed into the ceiling, but this inverter is considerably larger and heavier. I through bolted it into the area directly above (the coach floor under the galley drawers). I made several measurements to ensure I was drilling from below into the accessible area on top. Since there are many wires below the galley drawers, I propped them up and protected them with cardboard to create an open space for the drill bit to enter from below.
The installation manual for the XC Pro specifies certain clearances for the fans on either end of the inverter. Unfortunately, due to constraints in the limited area I could access for the through bolts under the galley drawers, the final mounting orientation has less clearance than specified. After 3+ months of daily operation, I haven’t had any overheating issues. To help monitor the temperature in that bay, I mounted a temp sensor that’s connected to my Wi-Fi enabled weather station that will send me an email if the temp exceeds whatever temp I set (100° F). The inverter will operate up to 140° F, though the output will be derated above 104° F. Despite traveling in warm spring temperatures in Florida, I haven’t run into any issues yet.
Bluetooth Inverter Remote Panel
Xantrex sells an inverter remote panel display separately in both a Bluetooth and non-Bluetooth version. I highly recommend the Bluetooth version (pictured). There is a free app that connects to the Bluetooth remote which allows you to monitor the details of the inverter’s operation, as well as manage all settings in a very easy-to-use app interface (see screenshots for my settings).
The standard way to configure the remote is to leave the button on both the remote and the actual inverter (in the compartment below) in the off (out) position. The only button you’ll ever touch going forward is the one on the remote when you need to use the inverter. If the button on the actual inverter is ever pressed in, then the inverter will stay on no matter what you do with the remote button. The inverter uses approximately 1.5 amps to operate, even without a load.
When you plug into shore power (or start your generator), the remote panel will light up and display information. This occurs because the 120vac is passing through the inverter and it’s active (though not inverting). See photo of the remote panel — this was taken while plugged in and bypassing the batteries.
By default, I disable the inverter’s charging capability by selecting “Charger Ignition Control” to “Auto-On”. If you’d like to use the charging function of the inverter, turn the “Charger Ignition Control” to “Off”. In the photos, I have “Charger Current” set to “90A” which is the standard charge rate for the Lion batteries. When I want to fast charge, I change this to “150A” or whatever number in-between makes the total charge going into the battery from all sources stay at or below 200A. When plugged into shore power, I use my converter to charge my batteries because it’s slower and quieter (no audible fan) and it powers all of my 12v systems. I only use the XC Pro’s charging for deliberate, fast charging (particularly when boondocking).
The remote comes with a 6-pin RJ-12 cable. I didn’t need to use it since my OEM Xantrex inverter remote also used a 6-pin RJ-12 cable and it was already wired to the area above the fridge. I did, however, need to Dremel out a larger opening to accommodate the larger remote panel.
Cold & Hot Weather / Battery Bay Insulation
One of the big differences with Lithium batteries vs. lead acid is Lithium’s inability to accept a charge below 32° F. The batteries will, however, discharge all the way down to -4° F. This means you can run things off the batteries in extreme cold, you just can’t recharge them.
I tested this while caught in a Texas snowstorm in February 2021. My batteries were already full before the cold snap event, where the highs were in the 20s and the lows in the teens. I was plugged in to a campground and had shore power the entire time. In this particular situation, it was irrelevant that I had Lithium batteries since I didn’t need to charge them or draw against them. Everything worked perfectly thanks to my converter running all of my 12v systems. My Lithium batteries were sitting idle; they weren’t charging, or discharging. The battery’s internal BMS (Battery Management System) prevents them from charging or discharging outside of their operating window.
I wanted to experiment unplugging and boondocking overnight, using only the batteries since they would have no issue discharging down to -4° F. However, when I ran the numbers, I wouldn’t have been able to make it all the way through the night on batteries while running the furnace, tank heaters and two 120vac reptile lights in my service bay (powered by the inverter). It was during this experience that I realized if/when I ever camp in freezing temps, I will be plugged in to a campground. Even if I could have charged my batteries the following day, I wouldn’t have made it through the night using 80% of 210ah.
Ultimately, if I decide to camp in freezing weather in the future, insulating and/or heating my batteries would be only one of two required changes. I would also need to increase the size of my battery bank. Since I’m otherwise very comfortable with the 210ah capacity during every other type of camping above freezing, I don’t intend to make any changes.
DC/DC Charger: Mounting and Installation
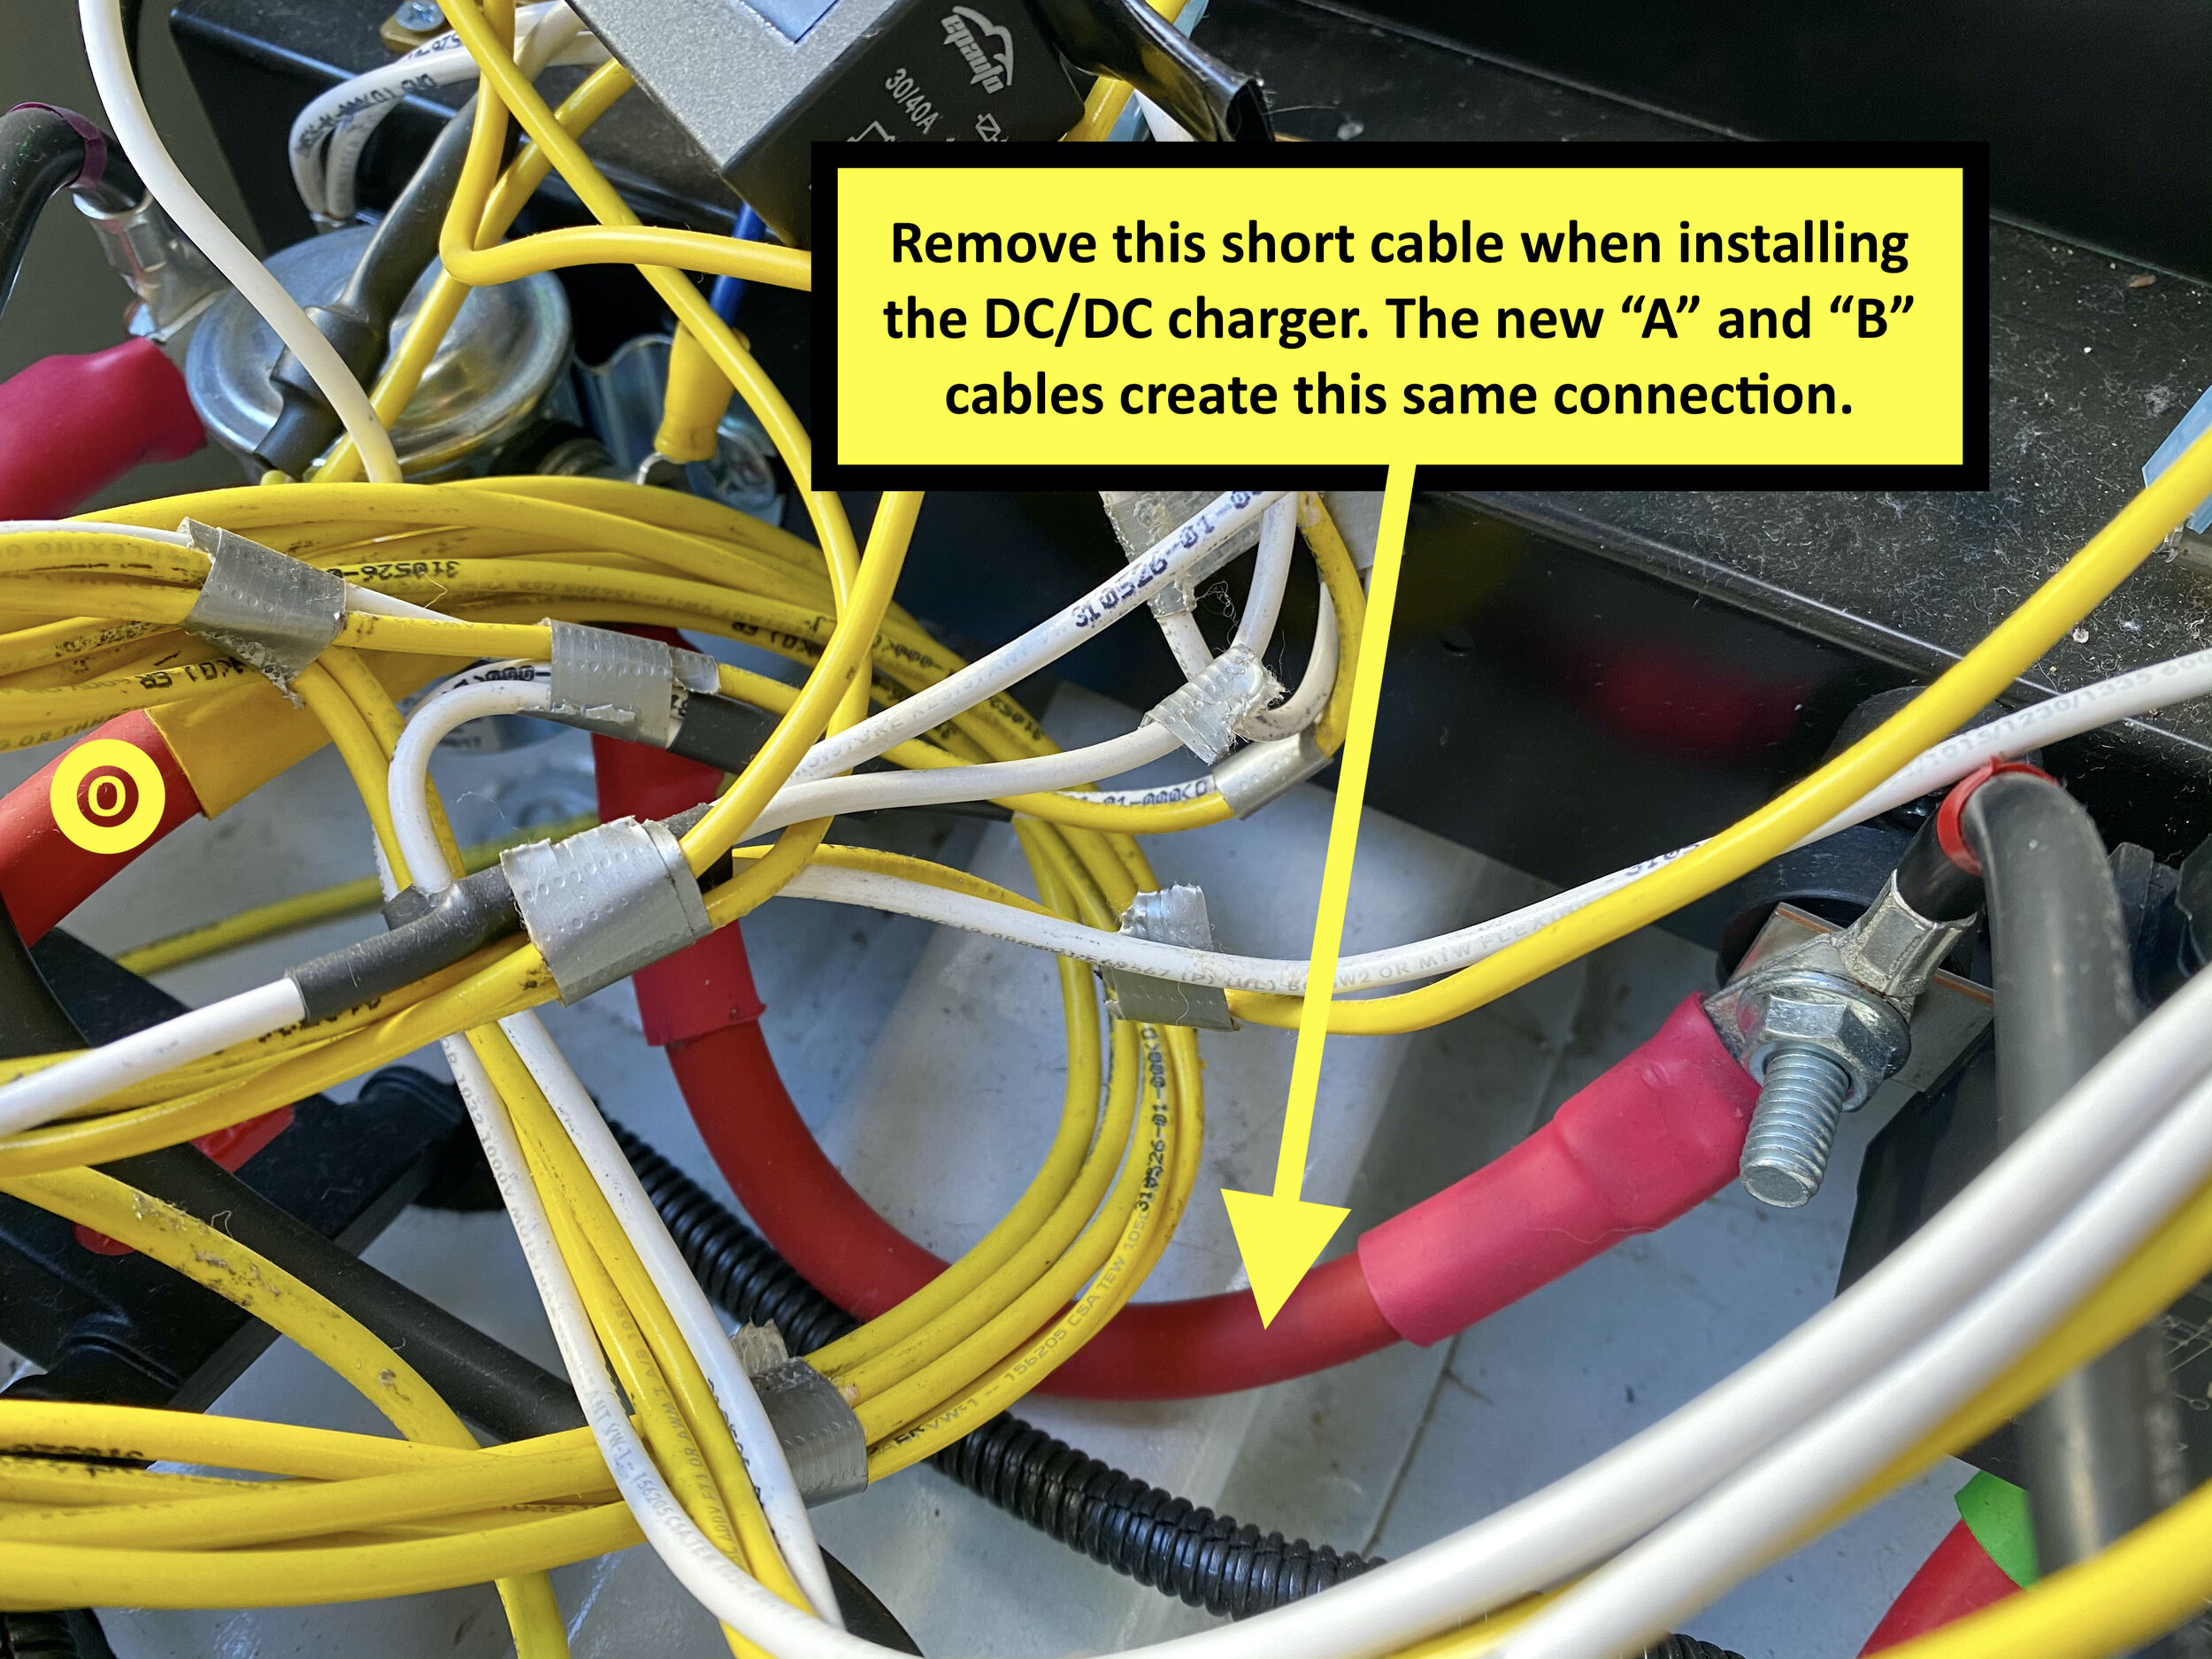
The original OEM house batteries were lead acid which is a type of battery that charges slowly. Even though the chassis alternator has a lot of power, the lead acid batteries couldn’t take advantage of the potential charge rate, so a limiting device wasn’t necessary. Lithium batteries, on the other hand, can accept an extraordinary amount of charge when compared to lead acid. So much charge, that it can overtax the alternator in the process. For this reason, it’s important to install a DC/DC Charger to regulate and limit the power from the alternator (similar to the importance of a water pressure regulator on your fresh water hose). There is a way to eliminate the boost solenoid in the process of installing a DC/DC charger, but I opted to keep it in place.
I installed the Victron 30 amp Non-Isolated DC/DC Charger under the passenger seat. Mercedes specifies a max of 40 amps, and this make/model uses approximately 35 amps of power to generate 30 amps of charge to the Lithium house batteries.
Before you get started, be sure to disconnect both your house and chassis batteries. I took photos of the install and labeled the wires “A”, “B”, and “C”. I used 6 AWG welding cable which is the largest gauge wire that the DC/DC charge can accept. As noted in the photos, it’s important to permanently remove the large gauge OEM cable that connects the boost solenoid to the coach battery disconnect relay — the addition of the “A” and “B” wires creates this same connection. I used a hydraulic battery cable crimper to complete one end of both the “A” and “B” wire with 6 AWG 3/8” battery lugs. To learn how to properly crimp battery cables, check out this 7-minute YouTube video.
You’ll also need to reposition the cable labeled “O” from the house side of the Boost Solenoid (not pictured) to the Coach Battery Disconnect (as pictured). This is an important step for everything to work properly.
For the ground connection, I used a large existing bolt under the passenger seat (see photos). This “C” wire required a larger ring terminal which I bought at the local auto parts store. To ensure conductivity with the bolt head, I scrapped off the white paint with a flathead screwdriver (see photo).
After wiring is complete, the mounting of the DC/DC charger is relatively straight forward. It fits snugly in the location pictured. I used 1” spacers to separate the heat sink from the metal seat base. I bought the spacers, machine screws, washers and nyloc nuts at Home Depot. Refer to the series of photos for details. Since the DC/DC charger can emit some significant heat, I cut out a small piece of the both the seat skirt and the foam layer (see photos).
Download the VictronConnect app to your mobile device to setup the DC/DC charger (same app used for the Victron BMV-712 Battery Monitor and Victron SmartShunt). Refer to the manual for important setup details.
For my battery monitor, I used these settings provided directly by Lion Energy.
PLEASE NOTE: If you follow this wiring of the DC/DC charger and your coach came with a boost switch to “jump start” your chassis engine from your house batteries, this boost function will become disabled. There are a couple work-arounds which I did not do, but one solution includes installing an A/B switch on the “O” cable (when the A/B switch creates a circuit with the “O” cable, your boost function will work — when the A/B switch is open, your DC/DC charger will work).
Amp-L-Start
If you don’t already have a way to trickle charge your chassis/starter battery from your house battery’s charging sources, now is a great time to add it since you’ll be working in the same area under your passenger seat! If you have any version of Trik-L-Start or a version of Amp-L-Start prior to “Revision H1” which was released in early 2021, you’ll need to upgrade to the latest version of Amp-L-Start. Only the latest version of Amp-L-Start (and no version of Trik-L-Start) will pass through the correct voltages to your starter battery when connected to Lithium house batteries.
Prior to the 2021 H1 version of Amp-L-Start, even the “lithium compatible” Amp-L-Start versions would pass on a constant voltage up to 14.6v to your starter battery. This will, in time, damage your starting battery! After corresponding with Joel at LSL Products, and explaining the issue in January 2021, LSL came out with revision H1 of the Amp-L-Start in February 2021 (which is the version I now have). The H1 device has updated firmware that will cut off voltage at 13.8v. The following italicized text is from Joel:
Your house battery charger is maintaining your Lithium batteries at a voltage considerably higher than the ideal "float" voltage for your lead-acid starting battery. In order to prevent your starting battery from also being exposed to this excessive voltage, AMP-L-START's "Lithium Mode" supplies charging current only until the starting battery reaches 13.8 volts, and then stops supplying current until the starting battery voltage drops down to its normal fully-charged "resting" voltage of 12.6 volts —- at which point the cycle repeats itself. So, you will see the starting battery voltage gradually cycle between 13.8 volts and 12.6 volts. Note that your starting battery is still fully charged over this entire range of voltages — it just produces a different voltage depending on whether or not some charging current is being supplied to it.
For installation, I followed the manufacturer’s instructions and used 12 AWG stranded wire along with Amp-L-Start’s supplied ring terminals (see photos for details and look for wires “D”, “E”, and “F”). For ground, I drilled a hole and scratched off the paint for conductivity. There are probably better places to grab ground, but this is the same location I used for my original 2017-era Amp-L-Start and it worked flawlessly for 3+ years. When connecting Amp-L-Start ring terminals to the posts on the Boost Solenoid (silver device) and the Coach Battery Disconnect Relay (black device), be sure to put the largest cables on the posts first, and the thinnest wires on last (closest to the nut).
UPDATE: Amp-L-Start is no longer being manufactured as of late 2022. If you can’t find one online or on eBay, I don’t know of a replacement product that serves the same purpose. There are, however, other methods to trickle charge your chassis battery that you can find online.
Boost Solenoid
If you have a 2011-2019 Winnebago View or Navion, and if you haven’t already had your boost solenoid fail, now is the time to preemptively replace it. It’s not a matter of if it will fail, but when! The boost solenoid — the silver device under the passenger seat — allows your house batteries to be charged by your alternator when driving.
I carried a spare solenoid for more than a year, but finally decided to install it during this mod since I was already working under the passenger seat. The undisputed make/model to buy is the Cole Hersee Boost Solenoid — do not replace the solenoid with the inferior make/model that Winnebago originally installed. For video instructions on the installation, I referred to this YouTube video.
The boost solenoid in the photos is the new Cole Hersee Boost Solenoid.
Progressive Industries EMS
If you don’t already have an EMS (Electrical Management System), and you’re interested in hard-wiring one into the coach, now is the perfect time to add one since this Battery/Inverter mod requires working with the connection between the shore power cord and the distribution panel. I did a detailed write up on the purpose and installation of the Progressive Industries EMS-HW30C which you can read by clicking here.
EasyStart for Air Conditioning
I had previously installed a Micro-Air EasyStart on my rooftop A/C unit which eases the initial power draw on compressor start. I made a detailed post here that explains the benefits and the installation process. When running the A/C on batteries, this is especially helpful, though I’m unsure if it’s necessary.
I’ve been able to start my A/C on batteries 100% of the time (upwards of 50 times in 3 months). My friend who now has the identical Lithium batteries and 3,000w inverter/charger setup does not have an EasyStart — that’s the only difference in our RV’s electrical system at this point. Sometimes he can start his A/C on his batteries, but sometimes the A/C shuts off immediately on compressor start and the inverter shows an “overload” error. I’m not certain why the inconsistency, but I’m guessing the EasyStart would solve the issue. I’ve never had an issue running the A/C on batteries in my coach and I’ve never had an inverter “overload” error.
Final Thoughts / Things to Know
There are a few details worth sharing to eliminate any surprises for those interested in replicating this major upgrade.
First, I would like to share three operational items. If you have a 3-way fridge, and it’s set to automatic, the fridge will automatically switch to AC when you turn the inverter on because the fridge thinks you’re plugged in. It’s important to switch it manually to another setting, otherwise you’ll run down your batteries quickly. Second, the OEM converter should only be turned on (via the circuit breaker) when on either shore power or generator. If you leave it on while inverting, it will try to charge the batteries, from the batteries. Nothing bad will happen other than you’ll run your batteries down quicker. Last but not least, the new inverter/charger’s internal cooling fans do turn on occasionally which can be heard inside the coach. This happens primarily when the device is under a heavy load inverting and/or when it’s passing a lot of current through the transfer switch when plugged in. The fans will also run when charging. As such, I only enable the charging feature for brief periods until the batteries are full, and then disable the charging feature and let the OEM converter trickle charge the batteries and convert 120vac to 12vdc.
Finally, the total cost to install everything I’ve outlined above and linked below was approximately $3,800 (inclusive of tax, shipping, etc.). It took between 3-4 full days of work (with a set of helping hands). During that time, I had to learn a lot about what I’ve written about, so it would probably take less time if you use this as a guide. As I mentioned at the top, it’s critical to read through the owner’s manuals of the components before installing them — I did, and I have only shared a fraction of what I’ve learned about their function.
Based on my experience with this upgraded system, if I was to do it over again, there is nothing I would change! I’m a very happy camper.
LINKS TO ALL COMPONENTS & TOOLS:
Lion Energy Lithium Batteries: www.lionenergy.com/products/lion-safari-ut-1300
Xantrex Freedom XC Pro Inverter/Charger: www.amazon.com/dp/B08C1VRWZL
Xantrex Bluetooth Remote Panel: www.amazon.com/dp/B08C1SFRFP
Xantrex Battery Temp Sensor: www.amazon.com/dp/B000K2K4SG
350amp DC Inverter Fuse: www.amazon.com/dp/B002E81I52
2/0 AWG Welding Cable: www.amazon.com/dp/B01ARBRM1Q
2/0 AWG 3/8'“ Battery Cable Lugs: www.amazon.com/dp/B073Y81SBM
2/0 AWG 5/16” Battery Cable Lugs: www.amazon.com/dp/B073Y7JMRQ
5/8” Split Loom Conduit: www.amazon.com/dp/B00KW97I5O
1/0 AWG Welding Cable: www.amazon.com/dp/B016HFD788
1/0 AWG 1/4” Battery Cable Lugs: www.amazon.com/dp/B073Y864WJ
1/0 AWG 5/16” Battery Cable Lugs: www.amazon.com/dp/B073Y9S8TT
1/0 AWG 3/8” Battery Cable Lugs: www.amazon.com/dp/B073Y75H66
1/2” Split Loom Conduit: www.amazon.com/dp/B0049DNUTW
10 AWG Romex Cable: www.amazon.com/dp/B000BQO9X2
Wago 10 AWG Connectors: www.amazon.com/dp/B085P2WT8K
Progressive Dynamics Converter Remote Pendant: www.amazon.com/dp/B007HS0PAI
Victron 12v 30-amp DC-DC Charger: www.amazon.com/dp/B086Q8YNJZ
6 AWG Black/Red Welding Cable: www.amazon.com/dp/B07KBD89D3
6 AWG 3/8” Lugs: www.amazon.com/dp/B08R6W3N3C
Amp-L-Start: https://bit.ly/3fLXhXC
12 AWG wire: www.amazon.com/dp/B00TG1TSUC
Cole Hersee Boost Solenoid: www.amazon.com/dp/B005K2429I
Cable Cutter: www.amazon.com/dp/B07VDLQTGK
Hydraulic Battery Cable Crimper: www.amazon.com/dp/B06XR8BY65
Heat Gun: www.amazon.com/dp/B07FSC19HL
Heat Shrink Tubing: www.amazon.com/dp/B07BZD5T6R